Don’t know how to install TYPO3 on Platform.sh? If you're a TYPO3 beginner or developer, installing TYPO3 manually, configuring Apache, PHP, and MySQL, can be confusing and time-consuming. with Platform.sh, you can deploy TYPO3 in just a few clicks, no server headaches, no manual setup, just fast, flexible TYPO3 hosting ready to go.
That’s where Platform.sh comes in. It gives you everything you need to install and run TYPO3 in the cloud, quickly and without the usual setup work.
Wait! Planning to launch your TYPO3 site on a different platform? Before you go further, check out our TYPO3 Installation Series for easy step-by-step guides to install TYPO3 on different platforms.
- How to Install TYPO3 on AWS
- 7 Steps to Install TYPO3 on Google Cloud
- Install TYPO3 with DDEV
- TYPO3 & Azure Cloud - 7 Steps to Install & Configure
- How to Install TYPO3 with Docker
Let’s dive in and build a powerful, secure TYPO3 environment — the right way — on Platform.sh.
In this guide, you’ll learn how to install TYPO3 on your Mac using Platform.shP step-by-step, without the need for a Linux server or expensive hosting.
Let’s get started!
What is Platform.sh?
Platform.sh is a versatile, cloud-based hosting solution designed to streamline DevOps. By automating infrastructure tasks (like deployments and scaling), it allows you to focus on development and innovation. This guide walks you through deploying TYPO3 on Platform.sh—covering everything from initial setup to final launch.
What is TYPO3?
TYPO3 is a free, open-source Content Management System (CMS) built to help businesses and organizations create, manage, and grow their websites. It was founded in 1997 by Kasper Skårhøj and has since become one of the most popular CMS platforms—especially across Europe.
TYPO3 is written in PHP and uses TypoScript, a powerful configuration language that allows for advanced customization and flexibility. You don’t need any special software—TYPO3 runs in your browser and outputs content using standard HTML and JavaScript.
Whether you’re running a small business site, a university portal, or a large enterprise website, TYPO3 can scale to fit your needs.
Imagine an enterprise CMS that evolves as your project grows—without piling on complexity. That’s TYPO3 for you! It’s an open-source powerhouse that excels at:
here are the key reasons that TYPO3 Developers, marketers, and agencies trust TYPO3 for its:
- Modularity: Make your website do exactly what you need. No more, no less.
- Security & Stability: Regular LTS (Long-Term Support) releases help you stay secure for years.
- Scalability: From a tiny local site to a massive global platform, TYPO3 can handle it.
- Community-Driven Development: Enjoy a lively global community that refines and evolves TYPO3 continuously.
Did You Know? TYPO3 powers over 500,000+ active websites around the world!
Read more TYPO3 Facts.
Why use TYPO3?
TYPO3 offers advanced features like granular user roles, multisite management, and a strong ecosystem of extensions. It’s perfect for businesses and agencies that need scalability and long-term support.
Why Run TYPO3 on Platform.sh?
- Git-Powered Deployments: Simply push changes via Git, and Platform.sh automatically builds and deploys your TYPO3 app.
- Ephemeral Environments: Test new features or updates on temporary branches without touching production.
- Auto-Scaling: Grow to accommodate traffic spikes without heavy manual intervention.
- Security & Compliance: Benefit from automated updates, multi-regional hosting, and built-in security best practices.
- Ease of Configuration: YAML-based environment definitions keep your hosting config version-controlled and reproducible.
Who’s This Guide For?
- Beginners who want a quick path to hosting TYPO3 on a PaaS.
- Intermediate/Advanced users exploring streamlined deployments and ephemeral environments for dev/test.
Requirements to Run TYPO3 on Platform.sh
1. Platform.sh Account
- Sign up at platform.sh
- You’ll use this to create and manage your TYPO3 project in the cloud.
2. TYPO3 Project Setup
- Start from Platform.sh’s official TYPO3 template, or
- Push your existing TYPO3 project to a Platform.sh Git repository.
3. Supported TYPO3 Version
- TYPO3 v10 LTS, v11 LTS, v12 LTS, or newer
- Always check for the latest stable TYPO3 version compatibility with Platform.sh.
4. Environment Configuration Files
- .platform.app.yaml – to define PHP settings, build and deploy steps
- .platform/services.yaml – to define database services like MariaDB or MySQL
- .platform/routes.yaml – to configure URLs and routing
5. Required Services
- PHP: TYPO3 recommends PHP 8.1 or 8.2
- Database: MySQL/MariaDB (configured via Platform.sh services)
- Web Server: Platform.sh uses Nginx internally, no manual setup needed
6. Composer
- TYPO3 installation on Platform.sh is Composer-based
- Make sure your project has a valid composer.json file with TYPO3 packages
7. Git & CLI Tools
- Push your code to Platform.sh using Git
- Optional: Use the Platform.sh CLI for faster local commands
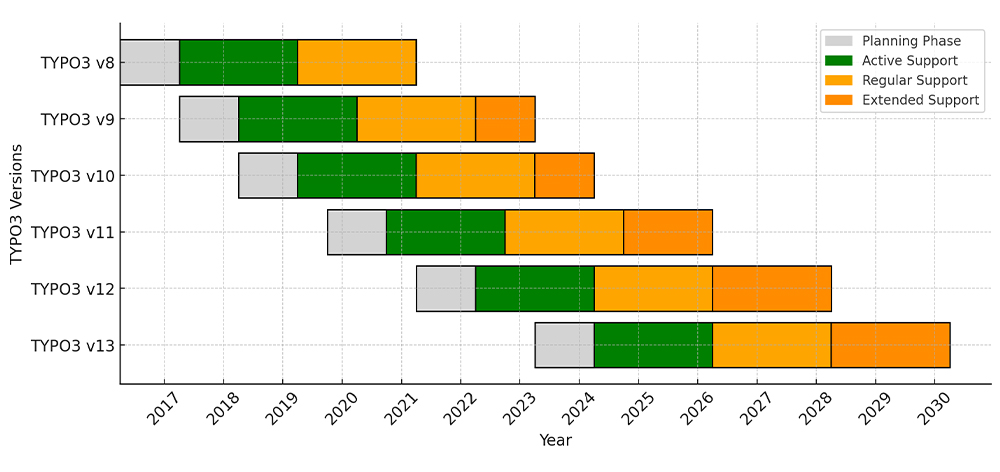
TYPO3 Versions & Support Roadmap
Before diving in, note TYPO3’s release cycles:
- LTS (Long-Term Support): Typically three years of updates per major release.
- ELTS (Extended LTS): Paid option if you need extra time beyond standard LTS.
Staying on a currently supported LTS means you’ll get important security patches and feature improvements.
TYPO3 Version & PHP Compatibility for Composer Install
1. PHP & TYPO3 Compatibility
| TYPO3 Version | PHP Versions | Status |
| 9 ELTS | 7.2–7.4 | Active ELTS |
| 10 ELTS | 7.2–7.4 | Active ELTS |
| 11 ELTS | 7.4, 8.0 | Active ELTS |
| 12 LTS | 8.1–8.4 | Active ELTS |
| 13 LTS | 8.2–8.4 | Active ELTS |
2. System Requirements
- Web Server: Apache or Nginx
- Database: MariaDB/MySQL recommended
- Composer: Recommended for a smoother TYPO3 experience
Always verify with TYPO3’s official System requirements to ensure you’re up to date.
A Complete Overview of the Platform.sh Tech Stack
Platform.sh organizes your project via a few key files and containers:
- .platform.app.yaml: Defines how your TYPO3 application is built and run.
- .platform/services.yaml: Specifies service containers (e.g., MariaDB, Redis).
- .platform/routes.yaml: Defines routing rules (HTTP/HTTPS) to your application.
- Git Repository: All code, including composer.json, is stored in a single source-controlled repo that triggers automated builds.
Architecture of Platform.sh & TYPO3
Diagram Explanation:
- You push code to Platform.sh via Git.+
- The platform builds TYPO3 with Composer in the build phase.
- Once deployed, TYPO3 runs in a container that communicates with a separate MariaDB container.
- Media files can be stored on persistent disk.
- Additional environments (e.g., feature branches) spin up automatically for testing.
Step-by-Step Guide to Installing TYPO3 on Platform.sh
Below is an outline for a standard Composer-based setup. Platform.sh strongly favors Composer for managing PHP dependencies, so this typically aligns well with TYPO3 best practices.
Step 1. Create a New Platform.sh Project
- Sign Up or Log In
- Head to your Platform.sh dashboard and create a new project.
- Select a Template (Optional)
- You can start with a generic PHP template or choose a custom skeleton if one is available.
- Install the Platform.sh CLI (Optional but recommended)
The CLI makes local development and environment management more convenient.
Step 2. Configure Services (MariaDB)
In your repository, you’ll generally have a .platform directory. Create or update services.yaml:
# .platform/services.yaml
db:
  type: mariadb:10.4
disk: 1024Step 3. Configure Application (.platform.app.yaml)
Create or modify your .platform.app.yaml to define how TYPO3 is built and run:
# .platform.app.yaml

name: app
type: php:8.1
disk: 2048

build:
  flavor: composer
  commands:
    # This command runs after 'composer install' is done
    post_install: |
      # Additional build steps (if needed)

web:
  locations:
    "/":
      root: "public"
      index: ["index.php"]

relationships:
  database: "db:mysql"

# This part ensures necessary PHP extensions
runtime:
  extensions:
    - mbstring
    - gd
    - intl
    - curl
    - zip
    - mysqli
    - opcache
    - xml
    - json

# Set environment variables, including for your TYPO3 context, if needed
variables:
  php:
    memory_limit: 512M
TYPO3_CONTEXT: ProductionKey points:
- type: php:8.1 ensures a container with PHP 8.1 is used.
- build.flavor: composer triggers composer install.
- web.locations points the web root to public (TYPO3’s typical public directory).
- relationships.database links this app to the db service configured in services.yaml.
Step 4. Composer Setup
Ensure your composer.json has the required TYPO3 dependencies:
{
  "name": "my-typo3-project",
  "type": "project",
  "require": {
    "typo3/cms-base-distribution": "^12.0",
    "php": "^8.1"
  }
}You might also include commonly used extensions here (e.g., georgringer/news).
Step 5. Set Up .platform/routes.yaml
Define how Platform.sh routes traffic to your TYPO3 app:
# .platform/routes.yaml
"https://{default}/":
  type: upstream
upstream: "app:http"This tells Platform.sh to send all HTTP/HTTPS requests to the app container defined in your .platform.app.yaml.
Step 6. Commit & Push
git add .
git commit -m "Add Platform.sh configuration for TYPO3"
git push platform mainBuild & Deploy: Platform.sh automatically runs composer install in a build container, then spins up the runtime containers with your new config.
Step 7. TYPO3 Installation Wizard
- Find Your Platform.sh Environment URL - In the Platform.sh dashboard or via CLI, locate the environment’s generated URL.
- Open the URL in a Browser - TYPO3’s install wizard should appear if everything is configured correctly.
- Database Credentials - Platform.sh injects environment variables for the DB (e.g., DATABASE or via PLATFORM_RELATIONSHIPS). The wizard often auto-detects them, but if needed, you can manually enter them by referencing database credentials in the environment.
- Complete Setup - Create your admin user, finalize installation, and log into TYPO3’s backend.
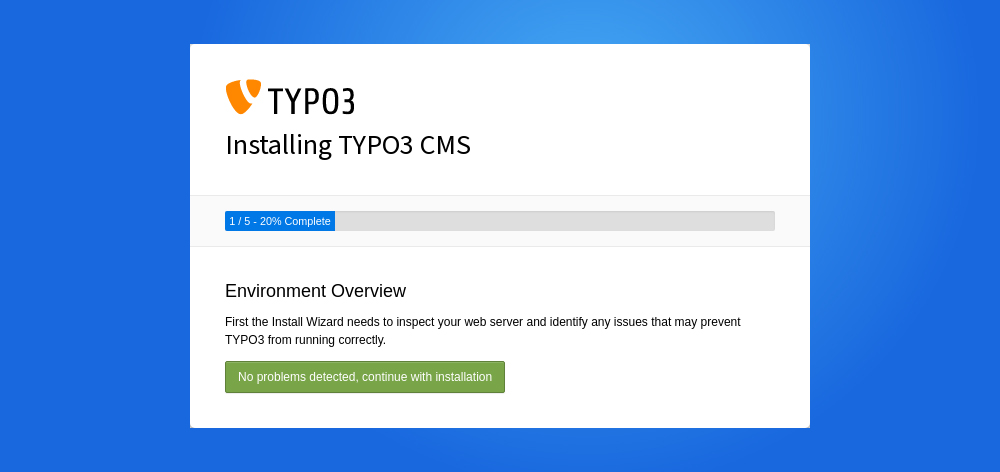
How to Start TYPO3 Installation Wizard
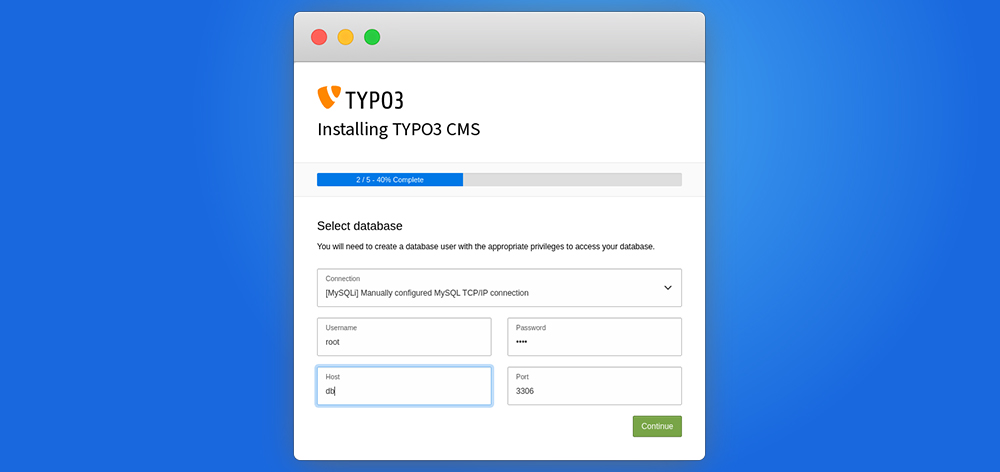
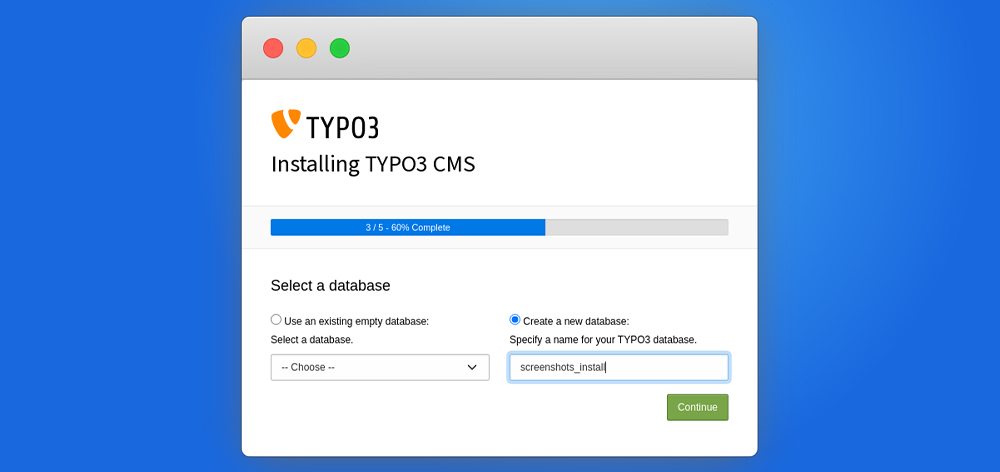
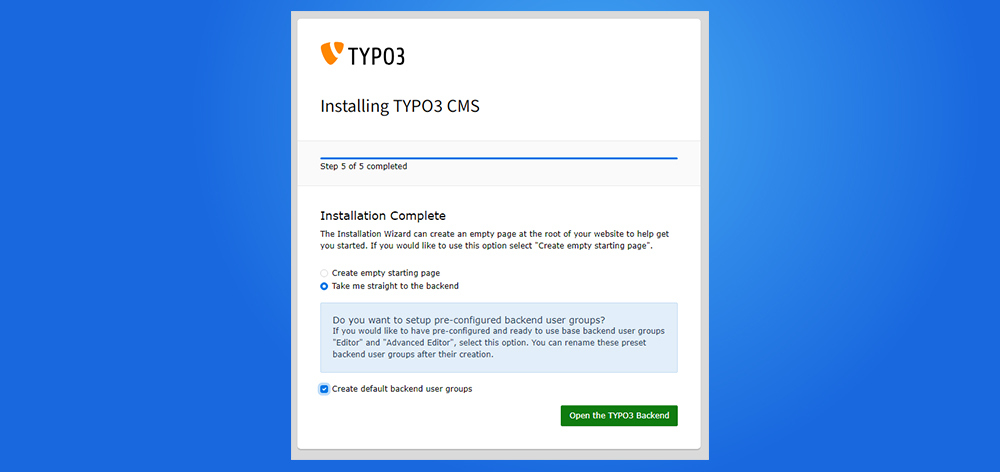
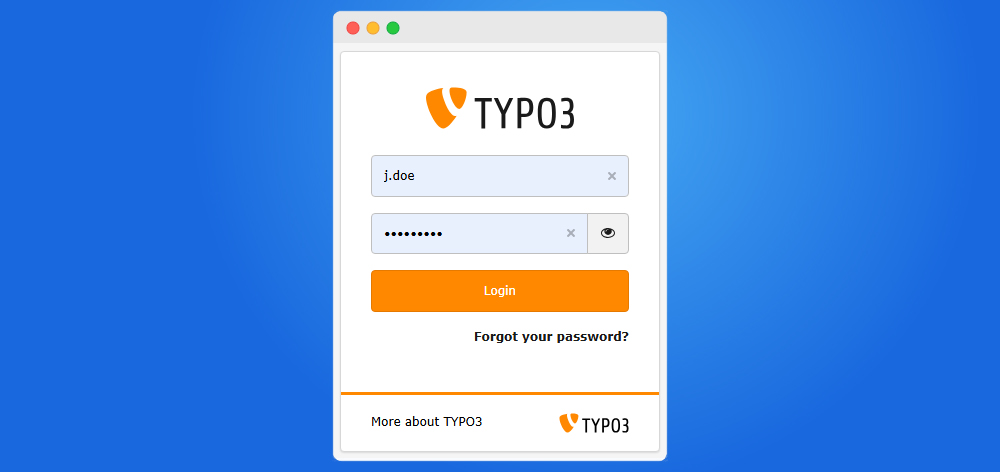
Once all server configurations are complete, it’s time to finish the setup through the TYPO3 Installation Wizard. This user-friendly, step-by-step wizard helps you finalize the installation process directly in your browser.
Step 1. Check the System Environment (detect if any issues)
Step 2. Setup Your Database Credentials
Step 3. Choose an Existing Database or Create a New
Step 4. Create backend user & Site
Step 5. Installation Process Start
Step 6. Get Start with Backend Login
DevOps Tips for Running TYPO3 on Platefom.sh
1. Use Composer for TYPO3 Installation
- Why: Composer keeps your TYPO3 project clean, versioned, and production-ready.
- Tip: Use
composer create-projectto install TYPO3. Avoid manually downloading ZIP files.
2. Define the PHP Version in .platform.app.yaml
- Why: TYPO3 requires specific PHP versions (e.g., PHP 8.1+ for v12).
- Tip: Specify the PHP version in your
.platform.app.yamlas follows:
3. Set Environment Variables for Configuration
- Why: Keeps sensitive data (like database credentials and contexts) out of your codebase.
- Tip: Use Platform.sh’s environment variable feature to define
TYPO3_CONTEXT, database settings, etc.
4. Use a Read-Only Web Root
- Why: Platform.sh uses an immutable file system at runtime.
- Tip: Store
fileadmin,uploads, andtypo3tempoutside of the web root using symbolic links or custom mounts.
Give A Try - Download & Install TYPO3
Visit get.typo3.org for comprehensive details on the release, including how to download and install TYPO3. The Installation Guide provides in-depth instructions for the installation process.
Conclusion
Platform.sh offers an elegant, Git-centric workflow for hosting TYPO3, letting you focus on development rather than wrangling servers. By following this complete tutorial, you’ll have a basic but powerful setup—complete with ephemeral test environments, automated builds, and a well-structured approach to managing TYPO3’s dependencies.
From here, you can explore advanced features like custom caching, multi-environment CI/CD workflows, or hooking into Platform.sh’s API for automated branch spin-ups. Whatever your plans, Platform.sh + TYPO3 is a powerful combo for streamlined, scalable website development.
Happy TYPO3ing on Platform.sh!
FAQ
It’s strongly recommended. Platform.sh’s default PHP build process relies on Composer to manage and install dependencies automatically.
It varies. You can specify a version in services.yaml (e.g., mariadb:10.4). Always consult the latest service catalog to confirm available versions.
The public/ directory can handle uploaded files, which are stored on persistent storage. Make sure you have enough disk allocated in your .platform.app.yaml.
Yes. Each Git branch can become an environment, complete with its own URL and isolated services.
Not mandatory, but it’s highly convenient for environment management, logs, and SSH access. You can also manage everything via the web dashboard.
Use the CLI: platform ssh and check in /var/log or environment-specific paths. You can also view logs in the Platform.sh UI.
Platform.sh automatically provisions SSL certificates for the default environment URL. For custom domains, upload your certificate via the dashboard or CLI.
Absolutely. Up your container size or add more containers (workers) in your plan. For big projects, advanced scaling features handle high-traffic demands.
Platform.sh supports multiple database types. Just specify the desired service (e.g., mysql:8.0) in services.yaml and update your .platform.app.yaml relationships accordingly.
Post a Comment
-
Client was already using Platform.sh, so I had to figure out how to get TYPO3 running on it. Wasn't familiar at all. This guide helped me get through it without hitting a wall. Just straight-up useful.





Wolfgang Weber
Brand & Communication LeadWolfgang Weber shapes TYPO3 with passion and expertise. As TYPO3 enthusiast, he has contributed to TYPO3 projects that make websites faster and more secure. Outside of TYPO3, you'll probably find him exploring local cafés and…
More From Author