Ready to tap into Google Cloud’s global infrastructure for your TYPO3 project? In this guide, we’ll walk you through each step to install TYPO3 on Google Cloud Compute Engine (VM-based). We’ll keep it beginner-friendly, pepper in essential tips, and provide a high-level look at how other Google Cloud services can enhance your TYPO3 setup—without going too deep into more advanced configurations.
Welcome to TYPO3!
In this guide, you’ll learn everything you need to get started with TYPO3 CMS. Whether you're a beginner, developer, or DevOps engineer, this step-by-step tutorial will help you Install TYPO3 on your environment with ease—especially on AWS.
What is TYPO3?
TYPO3 is a free, open-source Content Management System (CMS) built to help businesses and organizations create, manage, and grow their websites. It was founded in 1997 by Kasper Skårhøj and has since become one of the most popular CMS platforms—especially across Europe.
TYPO3 is written in PHP and uses TypoScript, a powerful configuration language that allows for advanced customization and flexibility. You don’t need any special software—TYPO3 runs in your browser and outputs content using standard HTML and JavaScript.
Whether you’re running a small business site, a university portal, or a large enterprise website, TYPO3 can scale to fit your needs.
Imagine an enterprise CMS that evolves as your project grows—without piling on complexity. That’s TYPO3 for you! It’s an open-source powerhouse that excels at:
here are the key reasons that TYPO3 Developers, marketers, and agencies trust TYPO3 for its:
- Modularity: Make your website do exactly what you need. No more, no less.
- Security & Stability: Regular LTS (Long-Term Support) releases help you stay secure for years.
- Scalability: From a tiny local site to a massive global platform, TYPO3 can handle it.
- Community-Driven Development: Enjoy a lively global community that refines and evolves TYPO3 continuously.
Did You Know? TYPO3 powers over 500,000+ active websites around the world!
Read more TYPO3 Facts.
What is TYPO3 Google Cloud?
TYPO3 Google Cloud refers to running the TYPO3 CMS on Google Cloud Platform (GCP) using its services like Compute Engine, Cloud SQL, Cloud DNS, and more. It combines the power of TYPO3’s enterprise-grade content management with Google Cloud’s scalable and secure infrastructure.
Why Run TYPO3 on Google Cloud?
If you're building a TYPO3 website and want it to be fast, secure, and ready to grow—Google Cloud Platform (GCP) is a great choice. Hosting TYPO3 on Google Cloud offers multiple advantages:
- Global Footprint: Deploy in data centers around the world for speedy, localized access.
- Scalability & Pay-As-You-Go: Start small and scale up quickly if traffic spikes.
- Security & Reliability: Enjoy built-in security features, stable VMs, and platform monitoring.
- Performance Tuning: Combine with optional features like load balancing or Cloud SQL.
Where Does TYPO3 Fit in the Google Cloud?
Before we dive into a step-by-step setup, let’s briefly address some key Google Cloud services and architectural considerations:
1) Compute Engine (VM-Based)
We’ll focus on Compute Engine, which provides you with virtual machines (VMs) running your preferred operating system (e.g., Ubuntu). This is often the simplest approach for many TYPO3 users who want direct control over their environment.
Other Notable Services
App Engine: A platform-as-a-service offering. You can use it for certain PHP apps, but it may require more custom configuration for TYPO3.
Cloud Run: Ideal for containerized applications. TYPO3 can run in containers, but it’s more advanced and may need additional config.
Google Kubernetes Engine (GKE): Used to orchestrate containers at scale. Perfect if you anticipate high traffic and want advanced auto-scaling, but it’s beyond the scope of this guide.
Which One to Choose?
If you need maximum control and a straightforward VM-based workflow, Compute Engine is your go-to.
If you’re comfortable with containers or want advanced scaling, consider Cloud Run or GKE.
2) Network Configuration (Firewalls, Static IP, DNS)
For most standard TYPO3 setups, you only need to open HTTP (80) and HTTPS (443). Google Cloud manages firewall rules in the VPC Network settings. If you need a custom domain, you can attach a static IP to your VM and update your DNS records accordingly—potentially using Google Cloud DNS.
Key features of Network Configuration
Keep it simple at first: just ensure your VM has HTTP/HTTPS access.
Reserve a static IP if you plan to use a custom domain.
Cloud DNS is optional but handy if you want Google Cloud to manage DNS for your domain.
3) Our Approach to Troubleshooting & Advanced Config
We’ll provide a comprehensive but not overly advanced guide. We’ll briefly mention:
- Load Balancing & Auto-Scaling: Great for high-traffic sites, but requires more steps to distribute requests across multiple VMs.
- Resource Monitoring: Tools like Stackdriver Monitoring can watch CPU, memory, and network usage.
- Additional Security: For more advanced needs (e.g., private VMs, VPC peering, custom firewall rules), you can expand your setup as your site grows.
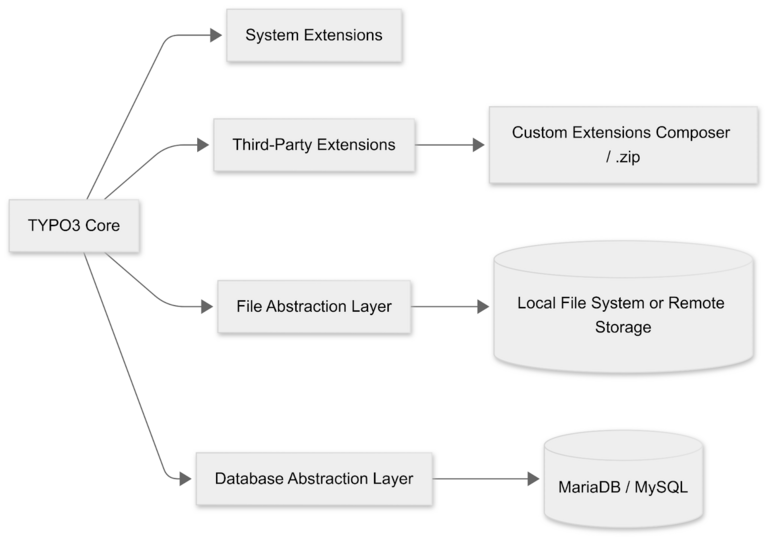
Architecture of Google Cloud & TYPO3
Diagram Explanation:
- User traffic hits Google Cloud’s firewall rules (allowing HTTP/HTTPS).
- Traffic is routed to a Compute Engine VM running Ubuntu, where the LAMP/LEMP stack hosts TYPO3
- TYPO3 either connects to a local database (MariaDB) on the same VM or optionally uses Cloud SQL for more scalable and managed database hosting.
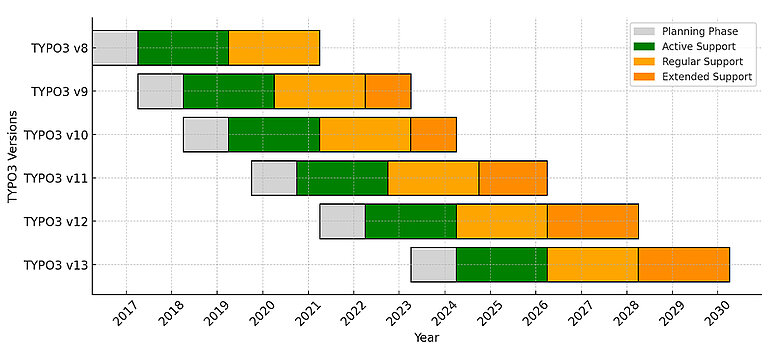
TYPO3 Versions & Support Roadmap
Before diving in, note TYPO3’s release cycles:
- LTS (Long-Term Support): Typically three years of updates per major release.
- ELTS (Extended LTS): Paid option if you need extra time beyond standard LTS.
Staying on a currently supported LTS means you’ll get important security patches and feature improvements.
TYPO3 Version & PHP Compatibility for Composer Install
1. PHP & TYPO3 Compatibility
| TYPO3 Version | PHP Versions | Status |
| 9 ELTS | 7.2–7.4 | Active ELTS |
| 10 ELTS | 7.2–7.4 | Active ELTS |
| 11 ELTS | 7.4, 8.0 | Active ELTS |
| 12 LTS | 8.1–8.4 | Active ELTS |
| 13 LTS | 8.2–8.4 | Active ELTS |
2. System Requirements
- Web Server: Apache or Nginx
- Database: MariaDB/MySQL recommended
- Composer: Recommended for a smoother TYPO3 experience
Always verify with TYPO3’s official System requirements to ensure you’re up to date.
How to Install TYPO3 on Google Cloud
We’ll now guide you through installing TYPO3 on a Compute Engine VM running Ubuntu. Let’s keep it straightforward and practical.
Step 1. Create a VM
- Project: Log into your Google Cloud Console, choose or create a project.
- Compute Engine → VM Instances: Click “Create Instance.”
- Machine & OS: Pick an e2-small or e2-medium. Use Ubuntu 22.04 LTS as the boot disk.
- Firewall: Enable “Allow HTTP” and “Allow HTTPS” to make your site publicly accessible.
How to Connect?
Use the console’s SSH button or configure your own SSH key to log into the VM.
Step 2. System Updates
sudo apt update && sudo apt upgrade -yStep 3. Web Server & Database
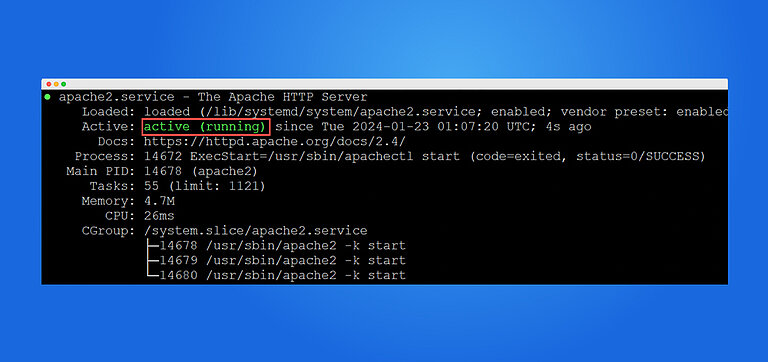
Apache Example
sudo apt install apache2 -y
sudo systemctl enable apache2
sudo systemctl start apache2MariaDB
sudo apt install mariadb-server mariadb-client -y
sudo mysql_secure_installation

sudo mysql -u root -p
CREATE DATABASE typo3db;
CREATE USER 'typo3user'@'localhost' IDENTIFIED BY 'supersecret';
GRANT ALL PRIVILEGES ON typo3db.* TO 'typo3user'@'localhost';
FLUSH PRIVILEGES;
EXIT;Step 4. PHP & Composer
sudo apt install php php-cli php-mysql php-xml php-gd \
php-curl php-zip php-intl php-mbstring -y(Optional) If using Nginx, also install php-fpm.
php -r "copy('https://getcomposer.org/installer', 'composer-setup.php');"
sudo php composer-setup.php --install-dir=/usr/local/bin --filename=composer
composer --version
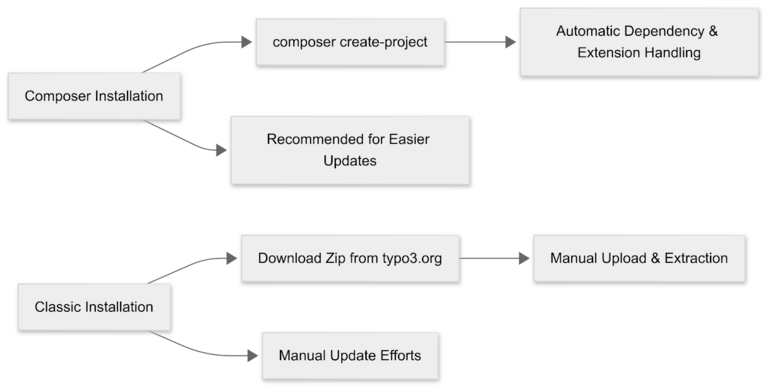
Step 5. TYPO3 Installation (Composer or Classic)
Composer Method
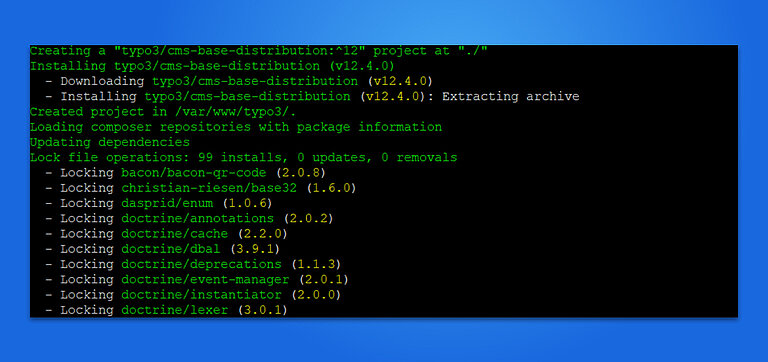
Install TYPO3 via Composer is the most modern and recommended approach. Composer ensures better dependency management, easy updates, and a more streamlined development workflow.
cd /var/www/html
sudo composer create-project typo3/cms-base-distribution typo3cms
sudo chown -R www-data:www-data typo3cms
sudo chmod -R 755 typo3cmsClassic TYPO3 Installation Method with our Composer
If you're not using Composer, you can install TYPO3 the classic way by downloading and manually setting it up. This method is suitable for shared hosting environments or users who prefer traditional installation steps.
- Download the .zip package from the official TYPO3 site.
- Unzip into /var/www/html/typo3cms.
- Adjust permissions similarly with chown and chmod.
Step 6. Web Server Configuration
<VirtualHost *:80>
    ServerName yourdomain.com
    DocumentRoot /var/www/html/typo3cms/public

    <Directory /var/www/html/typo3cms/public>
        AllowOverride All
        Require all granted
    </Directory>

    ErrorLog ${APACHE_LOG_DIR}/typo3-error.log
    CustomLog ${APACHE_LOG_DIR}/typo3-access.log combined
</VirtualHost>

sudo a2enmod rewrite
sudo systemctl restart apache2Step 7. Finalizing TYPO3 Installation
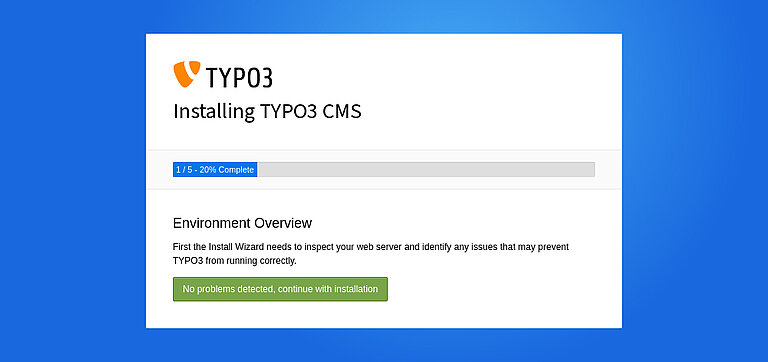
Open http: //yourdomain. com in a browser, and the TYPO3 Installation Wizard appears.
- Connect to the Database: Enter typo3db credentials.
- Create Admin User: Keep your admin name and password safe.
- Check Environment: TYPO3 may suggest adding or updating PHP extensions.
How to Start TYPO3 Installation Wizard
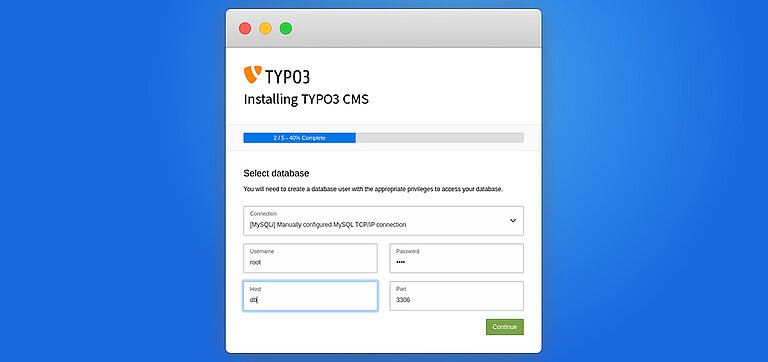
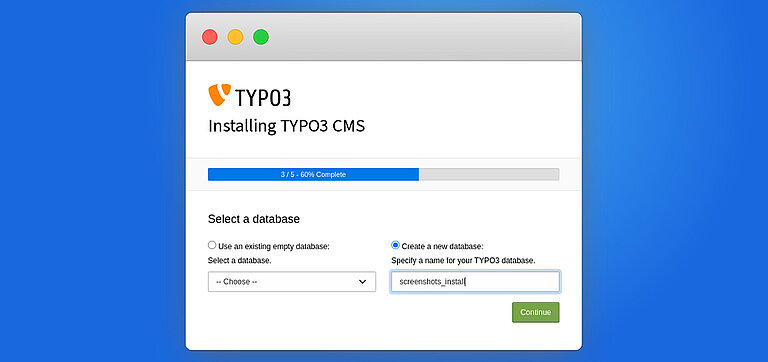
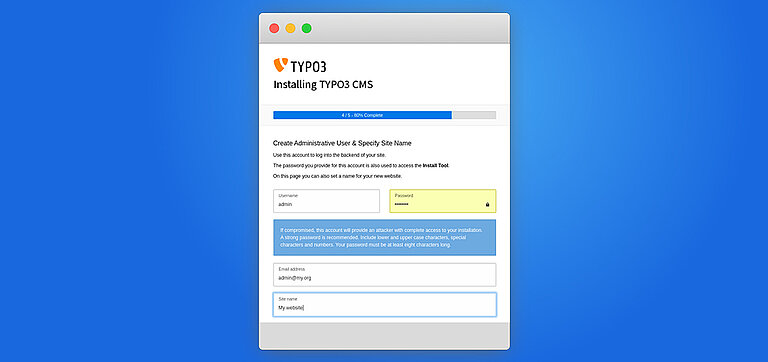
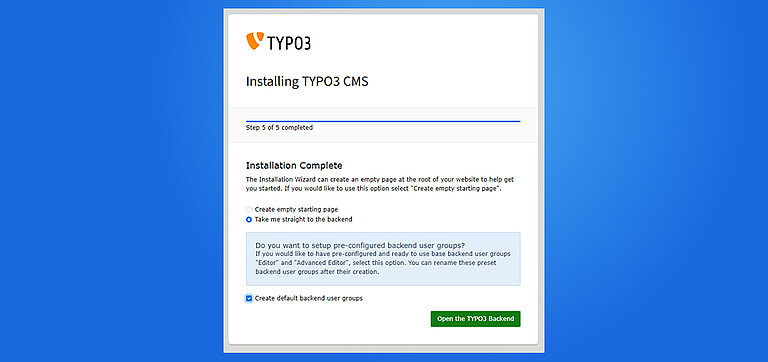
Once all server configurations are complete, it’s time to finish the setup through the TYPO3 Installation Wizard. This user-friendly, step-by-step wizard helps you finalize the installation process directly in your browser.
Step 1. Check the System Environment (detect if any issues)
Step 2. Setup Your Database Credentials
Step 3. Choose an Existing Database or Create a New
Step 4. Create backend user & Site
Step 5. Installation Process Start
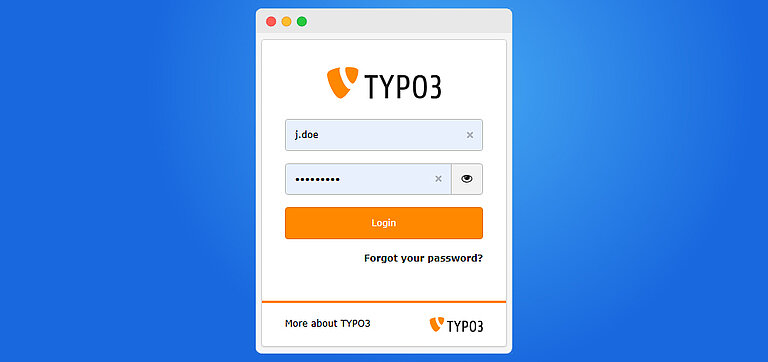
Step 6. Get Start with Backend Login
How to Install a TYPO3 Template using Composer
Below are two concise yet thorough sections you can integrate into your blog. They provide a straightforward guide on installing both a free TYPO3 template (ns_theme_agency) and a widely used TYPO3 extension (EXT:news). Adjust wording or formatting as desired to match your blog’s style.
Below is a more welcoming take on installing our free TYPO3 template and a popular TYPO3 extensions, EXT:news. Feel free to adjust the tone or style to match your brand.
Give Your TYPO3 Website a Fresh Look
You're in luck! Our free TYPO3 template, ns_theme_agency, gives your website a fresh, modern look in just a few easy steps. And if you want to add a blog or news section, the popular EXT:news extension is perfect for that too. Let’s walk through how to set up both in a simple and beginner-friendly way.
1. Installing Our Free TYPO3 Template
Why This TYPO3 Template?
Imagine a clean, mobile-friendly design that looks great on any device. With flexible layouts, you can create beautiful pages without needing to touch complex code. That’s exactly what ns_theme_agency offers—and it’s super easy to install!
Step-by-Step Guide to install TYPO3 Template via composer
1. Open Your TYPO3 Project in a Terminal
Fire up a terminal (or SSH) and make sure you’re in your TYPO3 installation folder.
// Run the Composer Command
	composer require nitsan/ns-theme-agency
typo3 extension:setup
// This pulls down the theme and sets it up behind the scenes.2. Flush Caches
- Use the “Flush Cache” button in the TYPO3 backend or the Install Tool to ensure the new theme is recognized.
3. Fine-Tune Your Look
- Adjust colors, layouts, or TypoScript settings to suit your brand.
- Explore the template’s docs for additional tips and best practices.
Key Features You Need Know
- Modern, Responsive Styling: Delivers a polished user experience on phones, tablets, and desktops.
- Flexibility Right Out of the Box: Layout elements and content blocks let you customize pages quickly.
- Community Backed: Updated regularly, so you can count on better security and compatibility over time
How TYPO3 Template Architecture Works?
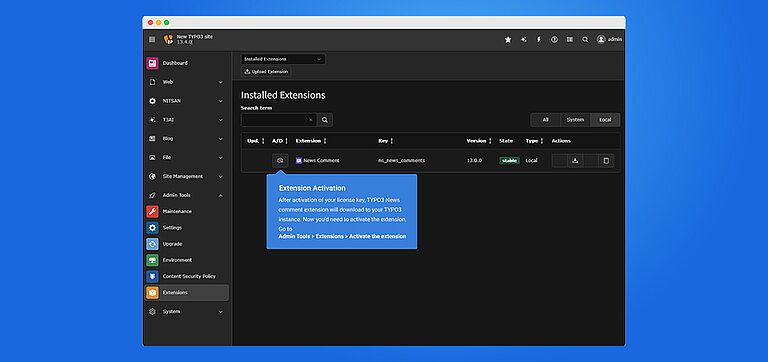
2. Installing a TYPO3 Extension
Step-by-Step Guide to Install TYPO3 Extension
1. Go-to into Your Terminal
- Navigate to your TYPO3 root directory.
2. Flush Caches
- Clear caches via the backend or Install Tool so your site picks up the new extension.
3. Set Up Your News Section
- Add a News Plugin to a page in the backend.
- Configure how news items are displayed—categories, tags, or detail pages.
- Save and preview your site to confirm everything’s running smoothly.
Standout Features of TYPO3 Extension
- Flexible Display Options: Create article listings, detail pages, and category-based archives.
- Smooth Editorial Flow: Editors can easily create and manage news items without developer help.
- Frequent Updates: A robust community helps keep EXT:news fresh and compatible with newer TYPO3 versions.
TYPO3 Google Cloud vs Other Platforms
Choosing the right environment for your TYPO3 project depends on your technical needs, budget, and scalability plans. Here’s a quick comparison to help you decide:
| Platform | Best For | Key Benefits | Things to Consider |
| Google Cloud Platform | Teams already using Google ecosystem | Easy G Suite integration, powerful analytics tools, scalable infrastructure | Slightly higher learning curve for beginners |
| AWS (Amazon Web Services) | Scalable production environments | High availability, global reach, flexible resources, strong security | Slightly higher learning curve for beginners |
| Microsoft Azure | Enterprises using Microsoft technologies | Seamless integration with Windows, Office, Active Directory, hybrid cloud | Licensing and costs may be higher |
| Docker / Docker Compose | Local dev, testing, or microservices setups | Lightweight, fast to deploy, reproducible environments | Needs Docker expertise, not ideal for large production without orchestration |
| Platform.sh | Developers focused on CI/CD & automation | Git-based workflows, automatic scaling, zero-downtime deployments | Less control over underlying infrastructure, premium pricing |
05+ Best Practices for Running TYPO3 Google Cloud
1. TYPO3 CI/CD Pipelines
Use GitHub Actions, GitLab CI, or Bitbucket Pipelines to automate deployments. Set up jobs to test, build, and deploy TYPO3 updates automatically.
2. TYPO3 Application Context
TYPO3’s Application Context helps you separate dev, test, and production modes. Set the TYPO3_CONTEXT environment variable for environment-specific configurations.
3. Security & Performance Tips for TYPO3
- Enable SSL/TLS: Get a free Let’s Encrypt certificate or use AWS Certificate Manager.
- Firewall & Security Group Rules: Limit inbound traffic to essential ports.
- Caching: Use built-in TYPO3 caching, or go advanced with Varnish or Redis. 40
4. TYPO3 Maintenance & Updates
- Composer Upgrades: cd /var/www/html/typo3cms && composer update
- Regular Backups: Snapshots via AWS or daily mysqldump exports.
- Staging Environments: Test new features or updates before going live
Conclusion
Deploying TYPO3 on Google Cloud Compute Engine offers a great balance of control, scalability, and cost-effectiveness. While this guide zeroes in on a single VM approach, you can tap into more advanced products—like Cloud Run, App Engine, or Kubernetes (GKE)—when you’re ready to scale or containerize.
By walking through these steps, you’ll have a robust TYPO3 environment up and running quickly. From here, you can explore customizing your Fluid templates, installing extensions, and leveraging other Google Cloud services to optimize performance and security.
Happy TYPO3ing on Google Cloud!
FAQs For TYPO3 Installation
Yes, but they require additional steps. This guide focuses on Compute Engine for maximum control.
Recommended if you plan to associate a domain name permanently; otherwise, your IP may change when the VM restarts.
Verify permissions: sudo chown -R www-data:www-data /var/www/html/typo3cms. Confirm Apache or Nginx config allows access.
Obtain a certificate (e.g., Let’s Encrypt) and configure it in Apache or Nginx. Ensure port 443 is open in the firewall settings.
Absolutely. Use your Cloud SQL instance connection info in LocalConfiguration.php. It’s a great way to offload DB maintenance.
Not at all. You can use the classic .zip approach, but Composer simplifies updates and manages dependencies automatically.
You can snapshot your VM and spin up more instances behind a load balancer. For more advanced scaling, consider GKE or containerization.
Monitor resources, optimize PHP settings (e.g., memory_limit), and consider adding a caching layer or using Cloud CDN for static files.
Create a Cloud DNS managed zone, point your domain’s name servers to Google Cloud, and add A/CNAME records. This centralizes your DNS management.
Yes, set up separate Apache Virtual Hosts or Nginx server blocks for each site.
Apache logs: /var/log/apache2/; Nginx logs: /var/log/nginx/; Check for any typo3-error.log if you’ve set custom logging.








Starke Brandt
Brand & Communication LeadStarke shapes the voice of T3Planet — and it shows. With years of TYPO3 experience in marketing and product branding, he ensures everything we publish reflects clarity, credibility, and purpose. He’s the reason our content…
More From Author