Are you looking to install TYPO3 on a rock-solid, enterprise-grade Linux distribution — without the overhead of commercial licensing? If you're aiming for long-term stability, security, and high compatibility for your TYPO3 project, Rocky Linux 9 is one of the best choices out there.
In this step-by-step guide, we’ll help developers, system administrators, and TYPO3 enthusiasts confidently install TYPO3 CMS on Rocky Linux 9 — without the usual guesswork.
Wait ! Before moving further, are you considering launching or hosting your TYPO3 site on another platform? We recommend checking out our TYPO3 Installation Series below for step-by-step guides on various platforms.
- How to Install TYPO3 on AWS
- 7 Steps to Install TYPO3 on Google Cloud
- Install TYPO3 with DDEV
- TYPO3 & Azure Cloud - 7 Steps to Install & Configure
- How to Install TYPO3 with Docker
Let’s dive in and build a powerful, secure TYPO3 environment — the right way — on Rocky Linux 9.
What is Rocky Linux?
Rocky Linux is a free, open-source, and community enterprise operating system intended as a 1:1 compatible replacement for Red Hat Enterprise Linux (RHEL). It was created by the Rocky Enterprise Software Foundation (RESF) as a reaction to the end of CentOS Linux.
What is TYPO3?
TYPO3 is a free, open-source Content Management System (CMS) built to help businesses and organizations create, manage, and grow their websites. It was founded in 1997 by Kasper Skårhøj and has since become one of the most popular CMS platforms—especially across Europe.
TYPO3 is written in PHP and uses TypoScript, a powerful configuration language that allows for advanced customization and flexibility. You don’t need any special software—TYPO3 runs in your browser and outputs content using standard HTML and JavaScript.
Whether you’re running a small business site, a university portal, or a large enterprise website, TYPO3 can scale to fit your needs.
Imagine an enterprise CMS that evolves as your project grows—without piling on complexity. That’s TYPO3 for you! It’s an open-source powerhouse that excels at:
here are the key reasons that TYPO3 Developers, marketers, and agencies trust TYPO3 for its:
- Modularity: Make your website do exactly what you need. No more, no less.
- Security & Stability: Regular LTS (Long-Term Support) releases help you stay secure for years.
- Scalability: From a tiny local site to a massive global platform, TYPO3 can handle it.
- Community-Driven Development: Enjoy a lively global community that refines and evolves TYPO3 continuously.
Did You Know? TYPO3 powers over 500,000+ active websites around the world!
Read more TYPO3 Facts.
Why use TYPO3?
TYPO3 offers advanced features like granular user roles, multisite management, and a strong ecosystem of extensions. It’s perfect for businesses and agencies that need scalability and long-term support.
Why Run TYPO3 on Rocky Linux?
Choosing Rocky Linux as the server environment for your TYPO3 CMS setup comes with several real-world advantages—especially for developers and enterprises seeking performance, stability, and control:
1. Enterprise-Grade Stability
Rocky Linux is a 1:1 binary-cloned version of Red Hat Enterprise Linux (RHEL). That is, you have the same stable, trusted, and long-term supported base without paying commercial license costs.
2. Community-Driven & Open Source
Developed by the Rocky Enterprise Software Foundation (RESF), Rocky Linux is backed by a strong community of contributors. This ensures transparency, freedom, and long-term viability—qualities that align with TYPO3’s open-source values.
3. High Compatibility
Rocky Linux uses the same software stack as RHEL, which means excellent compatibility with Apache, MariaDB, PHP, and all the key components required for TYPO3.
4. Predictable Lifecycle
With long-term support (LTS) releases and security updates, Rocky Linux is ideal for running mission-critical TYPO3 installations over extended periods without disruption.
5. Ideal for Enterprise Hosting
TYPO3 is built for large-scale websites and intranet portals, and Rocky Linux offers a hardened, secure environment that pairs perfectly with TYPO3’s backend and frontend capabilities.
Requirements to Run TYPO3 on Rocky Linux Smoothly
Before installing TYPO3 CMS on Rocky Linux, make sure your server meets the following system and software requirements. These will ensure a stable, secure, and high-performance TYPO3 installation.
Requirements
- Operating System: Rocky Linux 9 (64-bit)
- RAM: Minimum 2 GB (4 GB or more recommended for performance)
- CPU: Dual-core processor or higher
- Storage: At least 5 GB free disk space (more if handling large content/media)
- One Rocky Linux 9 Server
This guide uses a server with the hostname:TYPO3-Rock. - A Non-Root User with Sudo Privileges
Administrative access is required to install and configure packages securely. - SELinux in Permissive Mode
For smoother installation, ensure SELinux is temporarily set to permissive mode. You can enforce it later after proper configuration. - A Domain Name Pointing to the Server IP
For this example, we use:howtoforge.local(replace with your actual domain).
Who Can Benefit from This TYPO3 Install Guide?
- Developers - Who want to build and test TYPO3 projects in a stable, RHEL-compatible environment.
- System Administrators - Responsible for setting up and maintaining secure, scalable TYPO3 hosting stacks.
- Agencies & Freelancers - Who need a reliable and repeatable installation process for client deployments.
- TYPO3 Enthusiasts - Exploring TYPO3 CMS on modern Linux distributions like Rocky Linux.
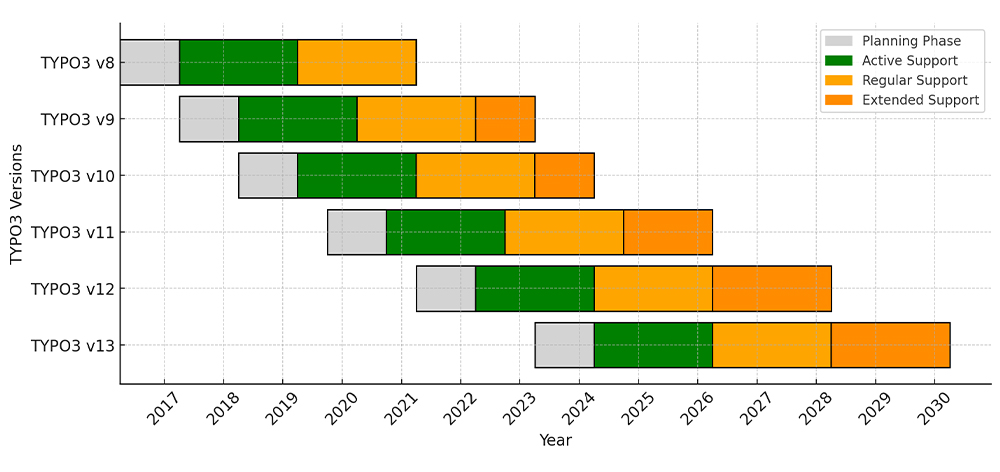
TYPO3 Versions & Support Roadmap
Before diving in, note TYPO3’s release cycles:
- LTS (Long-Term Support): Typically three years of updates per major release.
- ELTS (Extended LTS): Paid option if you need extra time beyond standard LTS.
Staying on a currently supported LTS means you’ll get important security patches and feature improvements.
TYPO3 Version & PHP Compatibility for Composer Install
1. PHP & TYPO3 Compatibility
| TYPO3 Version | PHP Versions | Status |
| 9 ELTS | 7.2–7.4 | Active ELTS |
| 10 ELTS | 7.2–7.4 | Active ELTS |
| 11 ELTS | 7.4, 8.0 | Active ELTS |
| 12 LTS | 8.1–8.4 | Active ELTS |
| 13 LTS | 8.2–8.4 | Active ELTS |
2. System Requirements
- Web Server: Apache or Nginx
- Database: MariaDB/MySQL recommended
- Composer: Recommended for a smoother TYPO3 experience
Always verify with TYPO3’s official System requirements to ensure you’re up to date.
sudo dnf update -y(If needed, enable EPEL or additional repos for certain PHP modules.)
Step 2. Install Web Server & Database
 sudo dnf install httpd mariadb-server mariadb -y
sudo systemctl enable httpd
sudo systemctl start httpd
sudo systemctl enable mariadb
sudo systemctl start mariadb
sudo mysql_secure_installation

Create DB/User:

 sudo mysql -u root -p
CREATE DATABASE typo3db;
CREATE USER 'typo3user'@'localhost' IDENTIFIED BY 'supersecret';
GRANT ALL PRIVILEGES ON typo3db.* TO 'typo3user'@'localhost';
FLUSH PRIVILEGES;
EXIT;
Step 3. PHP & Extensions
Rocky Linux typically uses modular packages. You may need to enable a specific PHP stream:
sudo dnf module reset php
sudo dnf module enable php:8.1 -y
sudo dnf install php php-mysqlnd php-xml php-gd php-curl \
                 php-zip php-intl php-mbstring -y
sudo systemctl restart httpdStep 4. TYPO3 Installation
Composer (install if not present):
sudo dnf install composer -y
cd /var/www/html
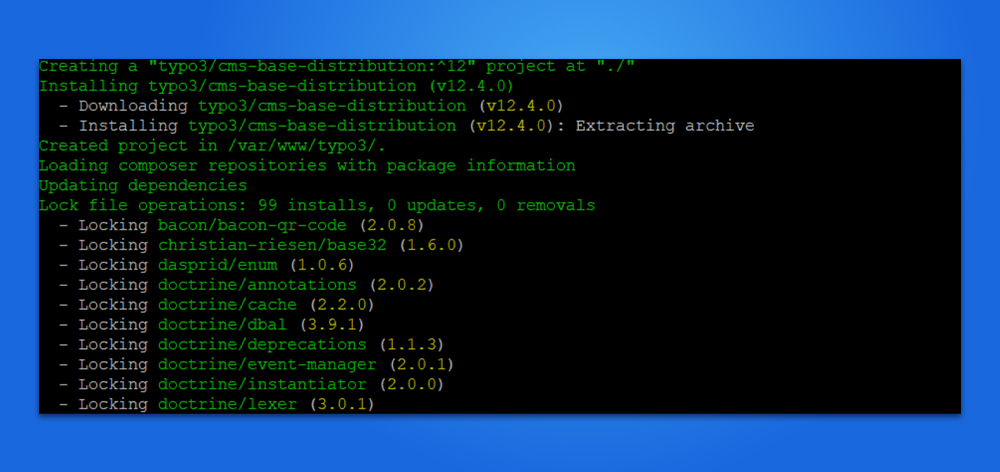
sudo composer create-project typo3/cms-base-distribution typo3cms
sudo chown -R apache:apache typo3cmsClassic Method
- Download TYPO3 zip from the official site.
- Unzip into /var/www/html/typo3cms.
- Set permissions similarly.
Step 5. Configure Apache (Example)
<VirtualHost *:80>
    ServerName yourdomain.com
    DocumentRoot /var/www/html/typo3cms/public

    <Directory /var/www/html/typo3cms/public>
        AllowOverride All
        Require all granted
    </Directory>

    ErrorLog /var/log/httpd/typo3-error.log
    CustomLog /var/log/httpd/typo3-access.log combined
</VirtualHost>

sudo vi /etc/httpd/conf/httpd.conf
# Ensure that "AllowOverride All" is set for your DocumentRoot
sudo systemctl restart httpd(Check SELinux contexts if you run into permission issues. For quick testing: sudo setenforce 0 temporarily, though be mindful of security.)
Step 6. Final Steps
Open YOUR_VM_IP or your custom domain in a browser:
- TYPO3 Installer Wizard will appear.
- Provide database credentials.
- Create an admin account.
- Login to the TYPO3 backend, and voilà—you’re set.
See below for a step-by-step guide on how to set up and install TYPO3.
How to Start TYPO3 Installation Wizard
Once all server configurations are complete, it’s time to finish the setup through the TYPO3 Installation Wizard. This user-friendly, step-by-step wizard helps you finalize the installation process directly in your browser.
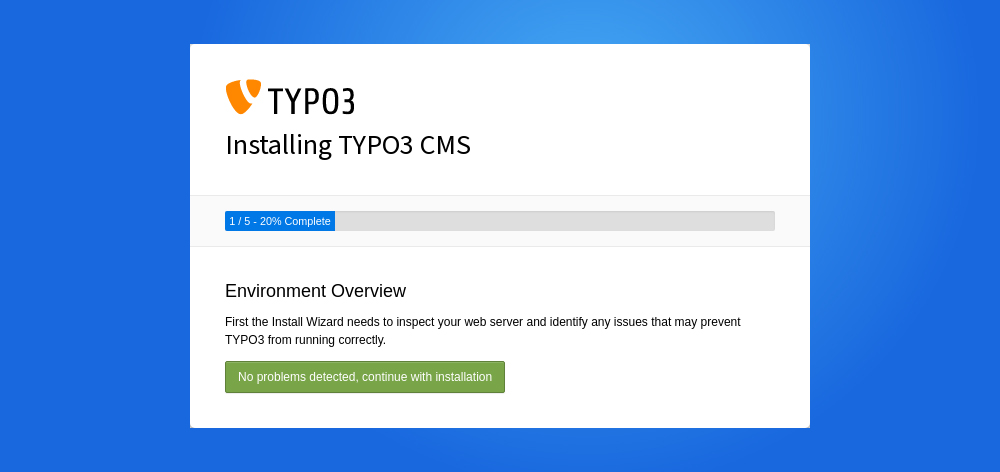
Step 1. Check the System Environment (detect if any issues)
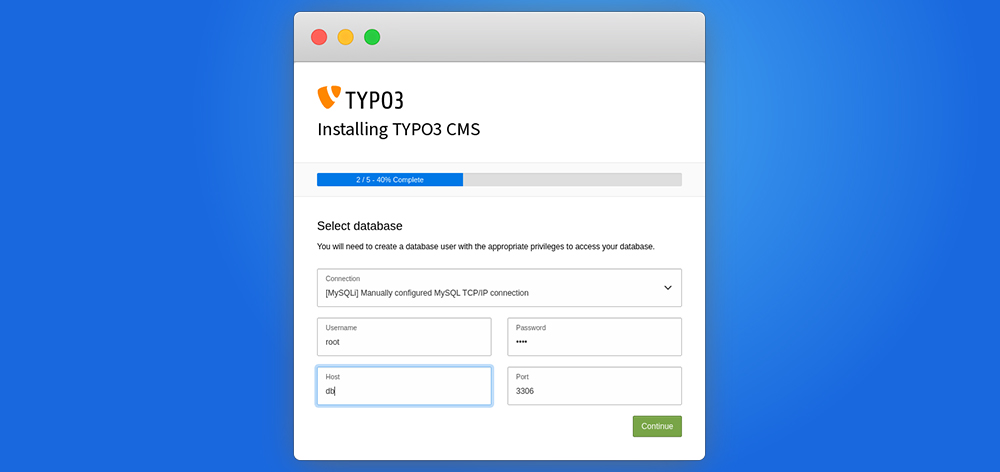
Step 2. Setup Your Database Credentials
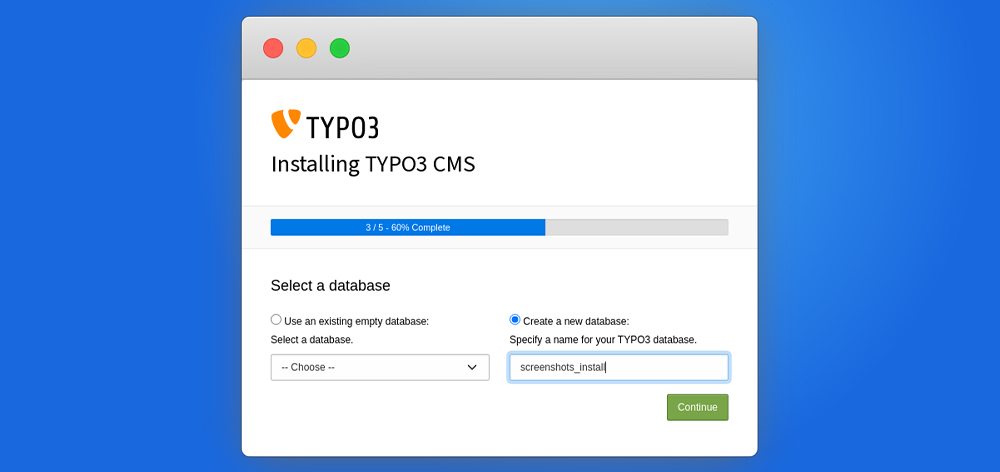
Step 3. Choose an Existing Database or Create a New
Step 4. Create backend user & Site
Step 5. Installation Process Start
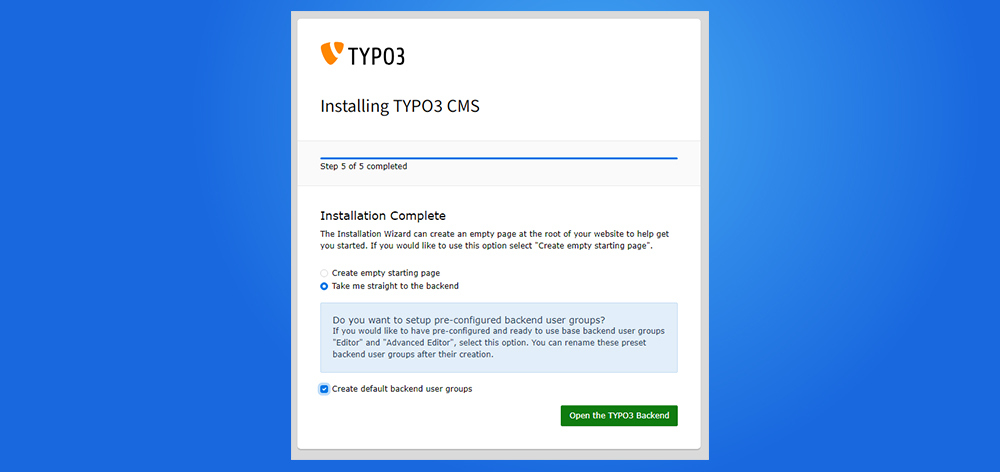
Step 6. Get Start with Backend Login
TYPO3 Rocky Linux vs Other Platforms
Choosing the right environment for your TYPO3 project depends on your technical needs, budget, and scalability plans. Here’s a quick comparison to help you decide:
| Platform | Best For | Key Benefits | Things to Consider |
| Rocky Linux | Developers and system administrators seeking enterprise-grade stability with full control | Free, stable, secure RHEL-compatible OS. | Requires manual setup and server management experience |
| Ubuntu (Self-Managed) | Developers and teams wanting full control and customization | Free, open-source, highly flexible,large community support, easy optimization for TYPO3 | Requires server management skills |
| Google Cloud Platform | Teams already using Google ecosystem | Easy G Suite integration, powerful analytics tools, scalable infrastructure | Slightly higher learning curve for beginners |
| AWS (Amazon Web Services) | Scalable production environments | High availability, global reach, flexible resources, strong security | Slightly higher learning curve for beginners |
| Microsoft Azure | Enterprises using Microsoft technologies | Seamless integration with Windows, Office, Active Directory, hybrid cloud | Licensing and costs may be higher |
| Docker / Docker Compose | Local dev, testing, or microservices setups | Lightweight, fast to deploy, reproducible environments | Docker-savvy, not ideal without orchestration. |
| Platform.sh | Developers focused on CI/CD & automation | Git-based workflows, automatic scaling, zero-downtime deployments | Less control over underlying infrastructure, premium pricing |
Top DevOps Tips for Running TYPO3 on Rocky Linux
1. Start with a Minimal Rocky Linux Install
Begin with a clean, minimal installation of Rocky Linux to reduce bloat and ensure maximum control. This helps streamline TYPO3 deployments and improves server performance.
2. Use Composer for TYPO3 Setup and Management
Always install TYPO3 using Composer for better version control and dependency management. Composer simplifies TYPO3 core and extension updates and integrates well with DevOps pipelines.
3. Set Up CI/CD Pipelines for Automated Deployments
Use GitLab CI, GitHub Actions, or Jenkins to build a CI/CD pipeline tailored to TYPO3. Automate tasks such as:
- Code validation and linting
- Composer install/update
- Cache clearing
- Database migrations (via TYPO3 CLI)
- Deployment to staging and production
4. Enable PHP-FPM and Opcode Caching
Install and configure PHP-FPM for better performance. Also, enable OPcache to reduce load times by storing precompiled script bytecode.
- For Example - sudo dnf install php-fpm php-opcache
5. Secure Your Rocky Linux + TYPO3 Stack
- Set strict file and directory permissions (chown -R apache:apache and chmod 755/644)
- install and configure SELinux or Fail2Ban
- Use HTTPS with Let’s Encrypt or another SSL provider
- Regularly update TYPO3, PHP, and system packages
Conclusion
Rocky Linux offers a stable, enterprise-grade environment for TYPO3 that closely mirrors RHEL. By leveraging the official repositories, SELinux, and regular security updates, you can build a robust, long-lasting TYPO3 hosting stack. For the installation instructions, simply follow the recommended steps to set up TYPO3 on your Rocky Linux environment seamlessly.
Happy TYPO3ing on Rocky Linux!
FAQ
Rocky Linux aims to fill the gap left by CentOS shifting upstream. It’s a 1:1 RHEL rebuild with a community foundation.
RHEL-based systems use module streams. You must explicitly enable the desired version (e.g., php:8.1).
Use chcon to set correct context or temporarily set SELinux to permissive mode. Best practice is to configure SELinux properly for production.
On RHEL-based distros, the Apache package is named httpd. Functionally it’s the same as Apache on Debian/Ubuntu.
Yes, it’s typically the default. You can install MySQL from alternative repos if needed.
Apache logs in /var/log/httpd/, MariaDB logs in /var/log/mariadb/ or /var/log/messages.
Rocky Linux uses dnf by default, though yum symlinks often still work.
Use sudo firewall-cmd --add-service=http --permanent and sudo firewall-cmd --reload to allow HTTP (and similarly for HTTPS).
sudo dnf update -y regularly, or set up automatic updates with dnf-automatic if desired.





Wolfgang Weber
Brand & Communication LeadWolfgang Weber shapes TYPO3 with passion and expertise. As TYPO3 enthusiast, he has contributed to TYPO3 projects that make websites faster and more secure. Outside of TYPO3, you'll probably find him exploring local cafés and…
More From Author