Are you trying to install TYPO3 on Kubernetes but don’t know where to begin? You’re not alone! Whether you're a developer, system admin, or just exploring cloud-native solutions for your TYPO3 website, setting it up on Kubernetes might sound tricky at first.
But don’t worry—this guide is here to help. We’ll walk you through the entire process step by step, making sure you can install TYPO3 with Kubernetes smoothly and confidently. By the end, you’ll have a TYPO3 site running inside a Kubernetes cluster—ready to scale, update, and perform like a pro.
Wait ! Before moving further, are you considering launching or hosting your TYPO3 site on another platform? We recommend checking out our TYPO3 Installation Series below for step-by-step guides on various platforms.
- How to Install TYPO3 on AWS
- 7 Steps to Install TYPO3 on Google Cloud
- Install TYPO3 with DDEV
- TYPO3 & Azure Cloud - 7 Steps to Install & Configure
- How to Install TYPO3 with Docker
Let’s dive in and build a powerful, secure TYPO3 environment — the right way — on Kubernetes.
What is Kubernetes?
Before we dive into the setup, let’s take a quick look at what Kubernetes actually is.
Kubernetes (often shortened to K8s) is a free, open-source platform designed to automate the deployment, scaling, and management of software inside containers. Think of it as the system that keeps your apps running properly—no matter how big they grow or how often they need updates.
When you install TYPO3 with Kubernetes, you get powerful features like:
- High availability: Your TYPO3 site can stay online, even if something goes wrong.
- Automatic scaling: More traffic? Kubernetes adds more resources.
- Rolling updates: Update TYPO3 with zero downtime
In simple terms, Kubernetes helps run your applications smoothly—so you don’t have to worry about the messy behind-the-scenes work.
What is TYPO3?
TYPO3 is a free, open-source Content Management System (CMS) built to help businesses and organizations create, manage, and grow their websites. It was founded in 1997 by Kasper Skårhøj and has since become one of the most popular CMS platforms—especially across Europe.
TYPO3 is written in PHP and uses TypoScript, a powerful configuration language that allows for advanced customization and flexibility. You don’t need any special software—TYPO3 runs in your browser and outputs content using standard HTML and JavaScript.
Whether you’re running a small business site, a university portal, or a large enterprise website, TYPO3 can scale to fit your needs.
Imagine an enterprise CMS that evolves as your project grows—without piling on complexity. That’s TYPO3 for you! It’s an open-source powerhouse that excels at:
here are the key reasons that TYPO3 Developers, marketers, and agencies trust TYPO3 for its:
- Modularity: Make your website do exactly what you need. No more, no less.
- Security & Stability: Regular LTS (Long-Term Support) releases help you stay secure for years.
- Scalability: From a tiny local site to a massive global platform, TYPO3 can handle it.
- Community-Driven Development: Enjoy a lively global community that refines and evolves TYPO3 continuously.
Did You Know? TYPO3 powers over 500,000+ active websites around the world!
Read more TYPO3 Facts.
Why use TYPO3?
TYPO3 offers advanced features like granular user roles, multisite management, and a strong ecosystem of extensions. It’s perfect for businesses and agencies that need scalability and long-term support.
Why Run TYPO3 on Kubernetes?
- Scalability & High Availability: Spin up additional Pods (container replicas) to handle traffic spikes or failures.
- Rolling Updates & Rollbacks: Deploy new TYPO3 releases with minimal downtime and easy rollback if needed.
- Resource Efficiency: Use cluster resources more effectively by scheduling containers across nodes.
- Ecosystem Integrations: Kubernetes works with numerous add-ons (e.g., Ingress controllers, service meshes, persistent storage providers).
Who’s This Guide For?
- Intermediate to Advanced devs or sysadmins comfortable with Docker/containers.
- Projects expecting higher traffic or requiring robust uptime.
Requirements to Run TYPO3 on Kubernetes Smoothly
1. Kubernetes Cluster
You need a functioning Kubernetes (K8s) cluster. This can be set up using:
- Local tools like Minikube or Kind for testing and development
- Managed cloud providers like Google Kubernetes Engine (GKE), Amazon EKS, Azure AKS, or DigitalOcean Kubernetes for production
2. Container Runtime
A container runtime such as Docker or containerd must be installed and supported by your Kubernetes environment. Most managed clusters include this by default.
3. TYPO3 Docker Image
Use a TYPO3 Docker image that includes the necessary components such as:
PHP
Apache or Nginx
TYPO3 Core
Required TYPO3 extensions
You can use official images or build a custom one tailored to your project needs.
4. Persistent Storage (PVCs)
TYPO3 needs persistent storage for:
Uploaded assets (images, documents)
Extension files
Configuration and temporary files
Configure PersistentVolumeClaims (PVCs) in your Kubernetes setup to ensure this data is retained across deployments.
5. Database (MySQL or MariaDB)
TYPO3 requires a database to function. You can deploy a MySQL or MariaDB database within the cluster or use an external managed service. Ensure the database has:
Proper credentials and user permissions
Persistent storage
Secure access from TYPO3 pods
6. Ingress Controller
Install an Ingress Controller like NGINX Ingress or Traefik to expose your TYPO3 application to the internet. This allows access via a domain name and supports SSL configuration.
7. PHP Configuration and Environment Variables
Ensure that the PHP environment is optimized for TYPO3, including:
Memory limits (256M or higher)
Maximum upload file size
Execution timeouts
Use ConfigMaps and Secrets to manage TYPO3-specific settings and sensitive environment variables such as database credentials, TYPO3 context, and SMTP settings.
8. Email Configuration
TYPO3 uses email for notifications, password recovery, and more. Set up a mail transport (SMTP) service using internal or third-party providers like SendGrid or Mailgun.
9. Monitoring and Logging
To maintain visibility into your TYPO3 instance, configure:
Monitoring tools like Prometheus and Grafana
Logging solutions such as the ELK stack or Loki
Health checks and pod logs via
kubectlor a Kubernetes dashboard
10. Helm (Optional but Useful)
Helm is a package manager for Kubernetes that simplifies deployment. Helm charts can automate the installation of TYPO3, databases, ingress, and other dependencies.
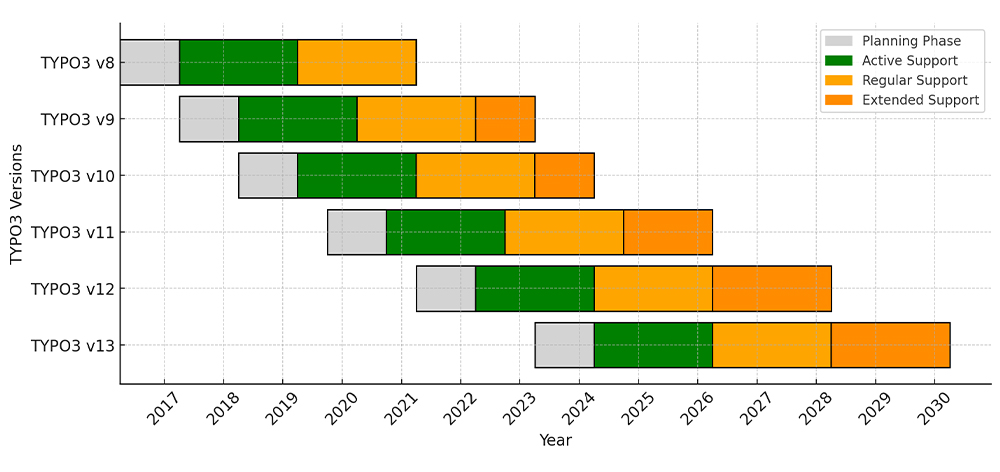
TYPO3 Versions & Support Roadmap
Before diving in, note TYPO3’s release cycles:
- LTS (Long-Term Support): Typically three years of updates per major release.
- ELTS (Extended LTS): Paid option if you need extra time beyond standard LTS.
Staying on a currently supported LTS means you’ll get important security patches and feature improvements.
TYPO3 Version & PHP Compatibility for Composer Install
1. PHP & TYPO3 Compatibility
| TYPO3 Version | PHP Versions | Status |
| 9 ELTS | 7.2–7.4 | Active ELTS |
| 10 ELTS | 7.2–7.4 | Active ELTS |
| 11 ELTS | 7.4, 8.0 | Active ELTS |
| 12 LTS | 8.1–8.4 | Active ELTS |
| 13 LTS | 8.2–8.4 | Active ELTS |
2. System Requirements
- Web Server: Apache or Nginx
- Database: MariaDB/MySQL recommended
- Composer: Recommended for a smoother TYPO3 experience
Always verify with TYPO3’s official System requirements to ensure you’re up to date.
Understanding TYPO3 Architecture on Kubernetes
Running TYPO3 in Kubernetes typically involves:
- A Deployment for the web + PHP container(s) running TYPO3 code.
- A Service (type: ClusterIP or LoadBalancer) to expose the TYPO3 Pod(s) internally or externally.
- A PersistentVolume (or PersistentVolumeClaim) to store file uploads and other persistent data.
- A Database, either within the cluster (MariaDB Deployment/StatefulSet) or an external/managed DB service (e.g., AWS RDS, Azure Database, Cloud SQL).
Architecture of Kubernetes & TYPO3
Diagram Explanation:
- Traffic enters the cluster via an Ingress or Service configured with a LoadBalancer (in a cloud environment).
- The TYPO3 Pods run the web server + PHP-FPM. They share a Persistent Volume for user uploads, images, etc.
- A separate MariaDB Deployment or an external database hosts the data, also typically backed by a persistent volume.
How to install TYPO3 on Kubernetes
Below, we’ll outline a simple local or cloud-based setup using YAML manifests. Adapt as needed for your environment (Minikube, EKS, GKE, AKS, etc.).
Step 1. Prerequisites
- Docker to build your TYPO3 image (if you’re customizing).
- A Kubernetes cluster (local using Minikube or a cloud provider).
- kubectl CLI connected to your cluster.
Quick Tip: Want to install TYPO3 with Docker? Read this guide.
(Optional) Consider using Helm for packaging, but we’ll stick to raw Kubernetes YAML for clarity.
Step 2. Build a TYPO3 Docker Image
If you already have a Docker image that includes TYPO3 + PHP + Nginx/Apache, skip this step. Otherwise:
# Example Dockerfile
FROM php:8.1-apache
RUN apt-get update && apt-get install -y \
    libxml2-dev libzip-dev libpng-dev libjpeg-dev mariadb-client \
    && docker-php-ext-install mysqli gd zip xml mbstring
# Copy your TYPO3 code into /var/www/html or mount it as a volume
COPY . /var/www/html
RUN chown -R www-data:www-data /var/www/html


// Build & push (if hosting externally):

docker build -t your-registry/typo3:latest .
docker push your-registry/typo3:latest
Step 3. MariaDB (or External DB)
Option A: Deploy MariaDB inside your cluster:
# mariadb-deployment.yaml
apiVersion: apps/v1
kind: Deployment
metadata:
  name: mariadb
spec:
  replicas: 1
  selector:
    matchLabels:
      app: mariadb
  template:
    metadata:
      labels:
        app: mariadb
    spec:
      containers:
        - name: mariadb
          image: mariadb:10.5
          env:
            - name: MYSQL_ROOT_PASSWORD
              value: supersecret
            - name: MYSQL_DATABASE
              value: typo3db
            - name: MYSQL_USER
              value: typo3user
            - name: MYSQL_PASSWORD
              value: supersecret
          volumeMounts:
            - name: db-pv
              mountPath: /var/lib/mysql
      volumes:
        - name: db-pv
          persistentVolumeClaim:
claimName: mariadb-pvcOption B: Use an external or managed DB (e.g., Amazon RDS, Azure Database for MySQL, etc.). In this case, skip deploying MariaDB in-cluster. Just configure your TYPO3 environment to point to the external DB host and credentials.
# mariadb-service.yaml
apiVersion: v1
kind: Service
metadata:
  name: mariadb-service
spec:
  selector:
    app: mariadb
  ports:
    - port: 3306
      name: mysql

// You’ll need a matching PersistentVolumeClaim:

# mariadb-pvc.yaml
apiVersion: v1
kind: PersistentVolumeClaim
metadata:
  name: mariadb-pvc
spec:
  accessModes:
    - ReadWriteOnce
  resources:
    requests:
storage: 1GiStep 4. TYPO3 Deployment & Service
Below is an example using Nginx + PHP-FPM in a single container (or an Apache-based image) to keep it simpler. Adjust the container image name to whatever you built or an existing image you prefer.
# typo3-deployment.yaml
apiVersion: apps/v1
kind: Deployment
metadata:
  name: typo3
spec:
  replicas: 2
  selector:
    matchLabels:
      app: typo3
  template:
    metadata:
      labels:
        app: typo3
    spec:
      containers:
        - name: typo3
          image: your-registry/typo3:latest
          ports:
            - containerPort: 80
          env:
            - name: TYPO3_DB_HOST
              value: mariadb-service
            - name: TYPO3_DB_NAME
              value: typo3db
            - name: TYPO3_DB_USER
              value: typo3user
            - name: TYPO3_DB_PASS
              value: supersecret
          volumeMounts:
            - name: typo3-files
              mountPath: /var/www/html/public/fileadmin
      volumes:
        - name: typo3-files
          persistentVolumeClaim:
            claimName: typo3-pvc
Persistent Volume Claim for user uploads, images, etc.:
# typo3-pvc.yaml
apiVersion: v1
kind: PersistentVolumeClaim
metadata:
  name: typo3-pvc
spec:
  accessModes:
    - ReadWriteOnce
  resources:
    requests:
storage: 2GiStep 5. Ingress (Optional)
If you’d like an external domain or LoadBalancer, configure an Ingress or a Service of type LoadBalancer. For example:
# typo3-ingress.yaml
apiVersion: networking.k8s.io/v1
kind: Ingress
metadata:
  name: typo3-ingress
  annotations:
    kubernetes.io/ingress.class: "nginx"
spec:
  rules:
    - host: your-typo3.example.com
      http:
        paths:
          - path: /
            pathType: Prefix
            backend:
              service:
                name: typo3-service
                port:
                  number: 80
Note: You’ll need an Ingress Controller (e.g., Nginx Ingress) installed in your cluster for this to work.
Step 6. Deploying to Kubernetes
Apply all YAML files in your cluster:
kubectl apply -f mariadb-pvc.yaml
kubectl apply -f mariadb-deployment.yaml
kubectl apply -f mariadb-service.yaml

kubectl apply -f typo3-pvc.yaml
kubectl apply -f typo3-deployment.yaml
kubectl apply -f typo3-service.yaml

# (Optional) Ingress
kubectl apply -f typo3-ingress.yaml

Check the status:
kubectl get pods
kubectl get svc
kubectl get ingressStep 7. Finalizing TYPO3
Once pods are running:
- Access the Service/Ingress: Go to the domain or external IP.
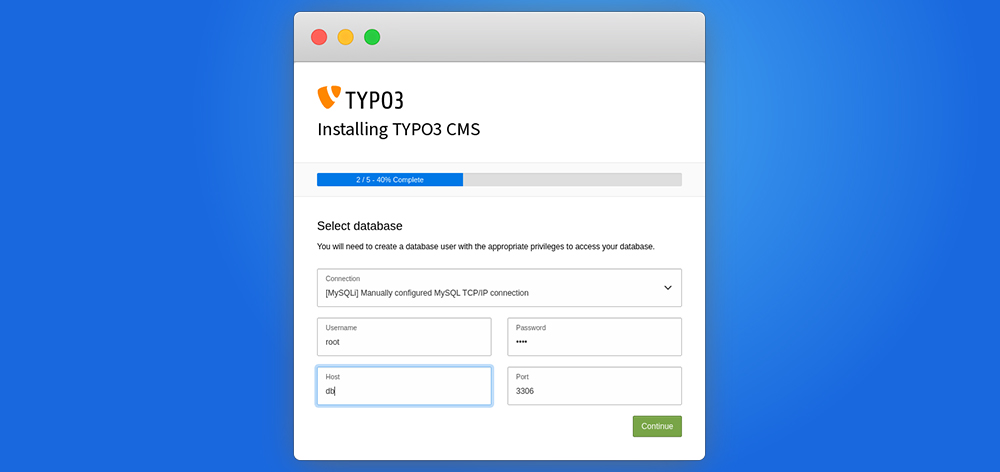
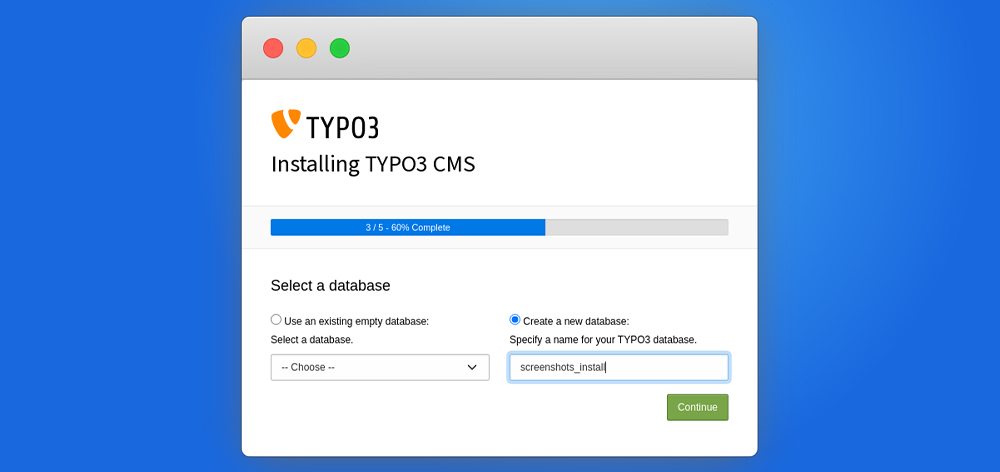
- Installation Wizard: If your image didn’t already include a pre-configured LocalConfiguration.php, you’ll see the TYPO3 install wizard. Provide DB host (mariadb-service), DB name, user, and password.
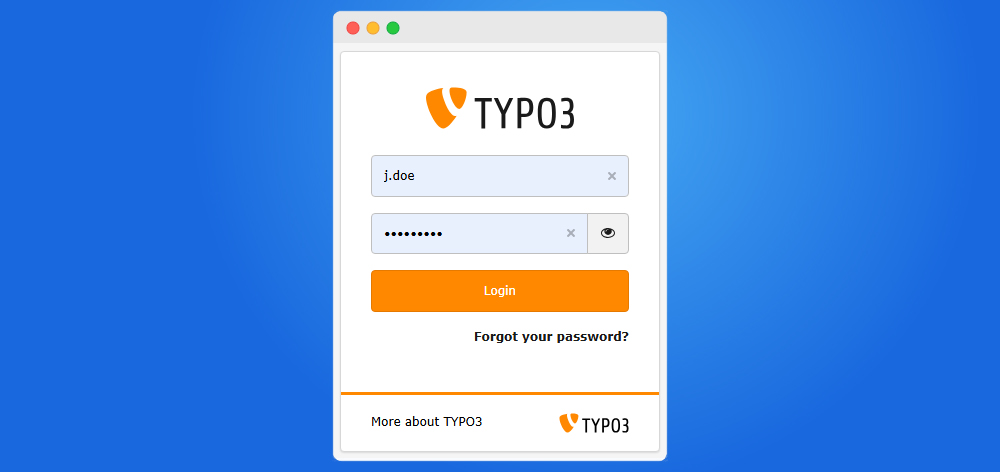
- Complete: Log into the backend and manage your TYPO3 site as usual.
How to Start TYPO3 Installation Wizard
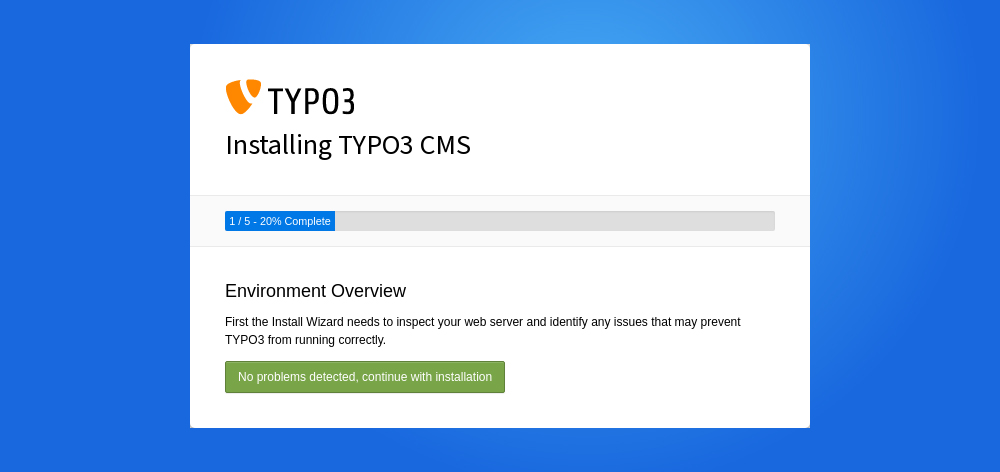
Once all server configurations are complete, it’s time to finish the setup through the TYPO3 Installation Wizard. This user-friendly, step-by-step wizard helps you finalize the installation process directly in your browser.
Step 1. Check the System Environment (detect if any issues)
Step 2. Setup Your Database Credentials
Step 3. Choose an Existing Database or Create a New
Step 4. Create backend user & Site
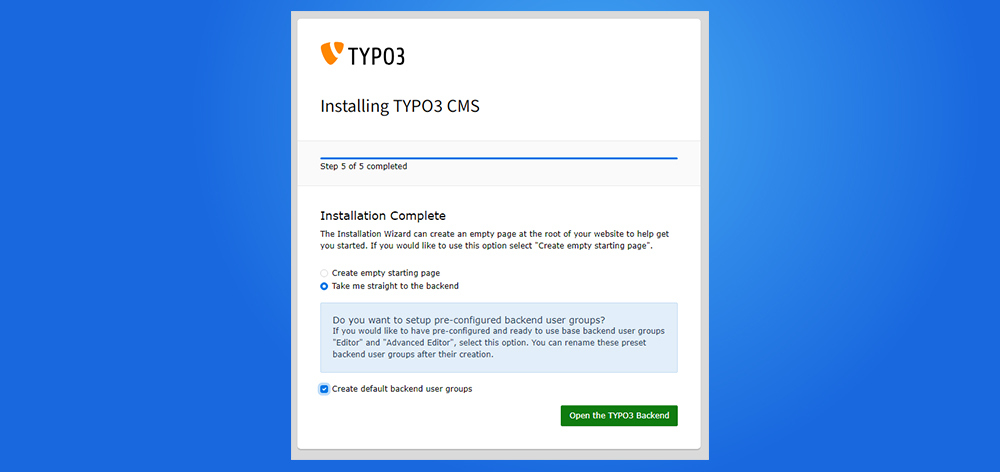
Step 5. Installation Process Start
Step 6. Get Start with Backend Login
DevOps Tips for Running TYPO3 on Kubernetes
- Use a Custom Docker Image - Build a TYPO3 image tailored to your project with the right PHP version, extensions, and configuration. Keep it lightweight and version-controlled.
- Leverage Helm Charts - Use Helm to package your TYPO3 application, database, and ingress settings. This simplifies deployment and rollback across environments.
- Implement GitOps Practices - Manage TYPO3 Kubernetes deployments using GitOps tools like Argo CD or Flux. This ensures version control, traceability, and automated syncing.
- Optimize Persistent Storage - Use PersistentVolumeClaims for fileadmin, uploads, and typo3temp folders. Choose a fast and reliable storage class for performance.
- Externalize Configuration with ConfigMaps and Secrets - Store environment variables, TYPO3 context, and credentials securely using Kubernetes ConfigMaps and Secrets.
- Enable Horizontal Pod Autoscaling - Scale TYPO3 pods automatically based on CPU or memory usage to handle traffic spikes without manual intervention.
- Use Readiness and Liveness Probes - Define probes to check TYPO3 health and prevent traffic from being routed to failing containers.
- Centralized Logging and Monitoring - Integrate tools like Prometheus, Grafana, Loki, or the ELK stack for better observability of TYPO3 containers, PHP errors, and database performance.
Conclusion
Running TYPO3 on Kubernetes offers a robust, scalable foundation for your CMS. By splitting out the web front end, PHP runtime, and database, you gain greater control over resource allocation, updates, and resiliency. Though Kubernetes has a steeper learning curve than simpler single-VM or Docker Compose setups, it pays off in advanced features like rolling updates, auto-scaling, and multi-cluster deployments.
Happy TYPO3ing on Kubernetes!
FAQ
Many prefer splitting these into separate containers for best-practice microservices. Our example lumps them for simplicity, but you can have one container for Nginx and another for PHP-FPM and link them in the same Pod.
Store them in Kubernetes Secrets rather than hardcoding in YAML. Then reference via env variables in your Deployment.
It can be done for small setups. For production or large-scale environments, consider an external/managed database service for reliability and performance.
Absolutely. Update your Docker image or Deployment definition, and Kubernetes will handle rolling updates. If something goes wrong, you can easily roll back.
Use a storage solution that supports ReadWriteMany (e.g., NFS, GlusterFS, or cloud file storage). That ensures all Pods can read/write to the same volume simultaneously.
Update your Docker image with the new TYPO3 version, push it to your registry, then modify the image tag in your Deployment’s YAML. K8s handles the rolling update.
Enable the Horizontal Pod Autoscaler (HPA) to scale up/down your TYPO3 deployment based on CPU or custom metrics. This is particularly beneficial for high-traffic sites.
Logs typically go to stdout/stderr. Use kubectl logs <pod> or a logging system (e.g., EFK stack—Elasticsearch, Fluentd, Kibana) for central log management.
Helm can simplify packaging and versioning. You might find existing charts for TYPO3 or create your own for a more streamlined workflow.
Point your domain’s DNS to the Ingress Controller’s external IP or LoadBalancer. Then specify that domain in the Ingress resource’s host.




Wolfgang Weber
Brand & Communication LeadWolfgang Weber shapes TYPO3 with passion and expertise. As TYPO3 enthusiast, he has contributed to TYPO3 projects that make websites faster and more secure. Outside of TYPO3, you'll probably find him exploring local cafés and…
More From Author