Setting up TYPO3 can sometimes feel overwhelming, especially when dealing with various dependencies and configurations. Docker offers a streamlined solution by containerizing your TYPO3 environment, ensuring consistency across development, staging, and production setups.
And the best part? You’ve got options. If you're looking for the easiest route, DDEV offers a fast and beginner-friendly solution. Want more control and flexibility? The WebDevOps Docker setup lets you fine-tune everything to your needs.
Ready to run TYPO3 smarter, faster, and cleaner? Let’s dive in and Dockerize TYPO3 the right way.
Before we dive into the step-by-step guide…If you're curious about the different ways developers are using Docker with TYPO3 , you might want to check out our companion article:
Docker is the world’s leading software containerization platform.
- docker.com
What is TYPO3?
TYPO3 is a free, open-source Content Management System (CMS) built to help businesses and organizations create, manage, and grow their websites. It was founded in 1997 by Kasper Skårhøj and has since become one of the most popular CMS platforms—especially across Europe.
TYPO3 is written in PHP and uses TypoScript, a powerful configuration language that allows for advanced customization and flexibility. You don’t need any special software—TYPO3 runs in your browser and outputs content using standard HTML and JavaScript.
Whether you’re running a small business site, a university portal, or a large enterprise website, TYPO3 can scale to fit your needs.
Imagine an enterprise CMS that evolves as your project grows—without piling on complexity. That’s TYPO3 for you! It’s an open-source powerhouse that excels at:
here are the key reasons that TYPO3 Developers, marketers, and agencies trust TYPO3 for its:
- Modularity: Make your website do exactly what you need. No more, no less.
- Security & Stability: Regular LTS (Long-Term Support) releases help you stay secure for years.
- Scalability: From a tiny local site to a massive global platform, TYPO3 can handle it.
- Community-Driven Development: Enjoy a lively global community that refines and evolves TYPO3 continuously.
Did You Know? TYPO3 powers over 500,000+ active websites around the world!
Read more TYPO3 Facts.
Why use TYPO3?
TYPO3 offers advanced features like granular user roles, multisite management, and a strong ecosystem of extensions. It’s perfect for businesses and agencies that need scalability and long-term support.
Why Run TYPO3 in Docker?
Setting up TYPO3 manually can take a lot of time — especially when you're dealing with PHP versions, web servers, databases, and other tools. That’s where Docker comes in. It simplifies the process by packaging everything TYPO3 needs into lightweight, portable containers. This means your TYPO3 environment will run the same way on every machine — whether you're on Windows, macOS, Linux, or in the cloud. No more configuration headaches, no more “it works on my machine” issues.
Benefits of using TYPO3 in Docker:
- Environment Consistency: Eliminate “it works on my machine” problems by running the same container image everywhere.
- Scalability: Spin up multiple container instances for load balancing or zero-downtime updates.
- Portability: Move or replicate your entire TYPO3 setup across various servers or cloud providers quickly.
- Isolation & Security: Containers keep application and system libraries separated.
Who’s This Guide For?
- New Docker Users learning about container-based hosting.
- Seasoned DevOps pros seeking a ready-to-use Docker Compose snippet for TYPO3.
Containers vs Virtual Machines in Docker
Before diving deeper into Docker for TYPO3, it’s important to understand how containers differ from traditional virtual machines (VMs). Both help isolate applications, but they do it in very different ways.
| Feature | Virtual Machines (VMs) | Containers |
| Architecture | Includes a full operating system, hypervisor, and the application | Shares the host OS kernel; isolates at the process level |
| Boot Time | Slow – takes minutes due to full OS boot | Fast – starts in seconds since no OS boot is needed |
| Resource Usage | Heavy – each VM runs a full OS, consuming more memory and CPU | Lightweight – minimal overhead by sharing the host OS |
| Isolation | Strong – hardware-level isolation provided by hypervisor | Strong – software-level isolation via namespaces and cgroups |
| Portability | Moderate – depends on the underlying hypervisor or platform | High – containers can run anywhere Docker is supported |
| Best Use Case | Running multiple operating systems, supporting legacy or OS-specific applications | Running microservices, CI/CD pipelines, TYPO3, and scalable app deployments |
Requirements of TYPO3 Docker
To run TYPO3 Docker, you mainly need the following components:
1. Docker & Docker Compose
- Docker: Install Docker to run containers.
- Docker Compose: Install Docker Compose to manage multi-container setups (like a web server and database).
2. DDEV (For Local Development)
DDEV is an open-source tool that simplifies the process of setting up local development environments using Docker. It supports TYPO3 and other CMS platforms, providing a streamlined workflow for developers.
- Installation Guide: DDEV Installation
3. PHP Version
- PHP: TYPO3 requires PHP 7.4 or above. Ensure your TYPO3 Docker image includes the correct PHP version (commonly PHP 7.4 or 8.x).
4. Web server (Apache or Nginx)
- Apache or Nginx: A web server to serve the TYPO3 application. You can use a pre-configured TYPO3 Docker image with Apache and PHP or configure Nginx with PHP-FPM.
5. Database (MariaDB or MySQL)
- MariaDB or MySQL: TYPO3 typically uses MariaDB or MySQL for the database. You can use the official TYPO3 Docker image for MariaDB or MySQL.
6. Docker Compose File
- Define your services (web server, database) in a docker-compose.yml file.
Docker & Docker Compose Overview
- Docker packages applications (like TYPO3, PHP, or MySQL) into lightweight, standalone containers.
- Docker Compose manages multi-container applications via a single YAML file, automating how containers link, share volumes, and communicate.
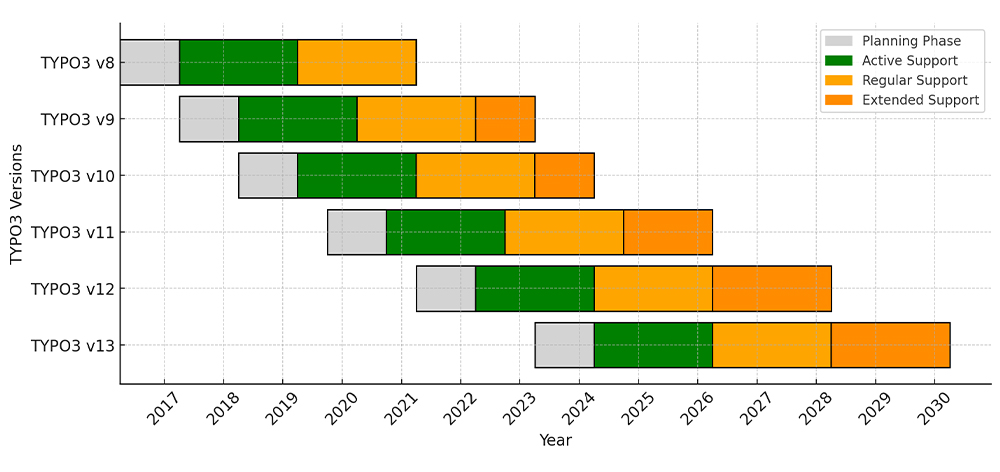
TYPO3 Versions & Support Roadmap
Before diving in, note TYPO3’s release cycles:
- LTS (Long-Term Support): Typically three years of updates per major release.
- ELTS (Extended LTS): Paid option if you need extra time beyond standard LTS.
Staying on a currently supported LTS means you’ll get important security patches and feature improvements.
TYPO3 Version & PHP Compatibility for Composer Install
1. PHP & TYPO3 Compatibility
| TYPO3 Version | PHP Versions | Status |
| 9 ELTS | 7.2–7.4 | Active ELTS |
| 10 ELTS | 7.2–7.4 | Active ELTS |
| 11 ELTS | 7.4, 8.0 | Active ELTS |
| 12 LTS | 8.1–8.4 | Active ELTS |
| 13 LTS | 8.2–8.4 | Active ELTS |
2. System Requirements
- Web Server: Apache or Nginx
- Database: MariaDB/MySQL recommended
- Composer: Recommended for a smoother TYPO3 experience
Always verify with TYPO3’s official System requirements to ensure you’re up to date.
Install TYPO3 with Docker
Below is a sample docker-compose.yml for a basic TYPO3 setup. It uses separate containers for web/PHP, database, and an optional composer step to manage dependencies.
Step 1. Project Structure
my-typo3-project/
 ├─ docker-compose.yml
 ├─ public/ (or "typo3cms/")
└─ ... any other project files ...Step 2. Sample docker-compose.yml
version: '3.7'
services:
  web:
    image: nginx:stable
    container_name: typo3-web
    ports:
      - "80:80"
    volumes:
      - ./public:/var/www/html
      - ./nginx.conf:/etc/nginx/conf.d/default.conf:ro
    depends_on:
      - php
    networks:
      - typo3net

  php:
    image: php:8.1-fpm
    container_name: typo3-php
    volumes:
      - ./public:/var/www/html
    working_dir: /var/www/html
    depends_on:
      - db
    networks:
      - typo3net

  db:
    image: mariadb:10.5
    container_name: typo3-db
    environment:
      - MYSQL_ROOT_PASSWORD=supersecret
      - MYSQL_DATABASE=typo3db
      - MYSQL_USER=typo3user
      - MYSQL_PASSWORD=supersecret
    volumes:
      - db_data:/var/lib/mysql
    networks:
      - typo3net

networks:
  typo3net:

volumes:
db_data:Key Points:
- Nginx container mounts nginx.conf for site config and shares the public/ folder.
- PHP container has public/ as well, so code changes are visible to both containers.
- MariaDB container is configured with environment variables for DB name, user, and password.
- All containers are in the typo3net network for easy internal DNS resolution (e.g., db as hostname).
Step 3. (Optional) Nginx Configuration
Sample nginx.conf:
server {
    listen 80;
    server_name localhost;

    root /var/www/html/public;
    index index.php;

    location / {
        try_files $uri /index.php$is_args$args;
    }

    location ~ \.php$ {
        include fastcgi_params;
        fastcgi_param SCRIPT_FILENAME $document_root$fastcgi_script_name;
        fastcgi_pass typo3-php:9000; # the service name:port from docker-compose
    }
}Step 4. Running & Composer Steps
- Pull Images & Start Containers
docker-compose up -d
Composer (Optional)
You can embed Composer in a custom Dockerfile or run a one-off container:
docker run --rm -v $(pwd)/public:/app -w /app composer install- If you prefer the official typo3/cms-base-distribution, you can fetch it locally then copy files into public/.
3. Permissions
Ensure file ownership/permissions are appropriate for the user running PHP inside the container. On Linux, you might do:
sudo chown -R $USER:$USER publicStep 5. Complete TYPO3 Installation
See below for a step-by-step guide on how to set up and install TYPO3.
How to Start TYPO3 Installation Wizard
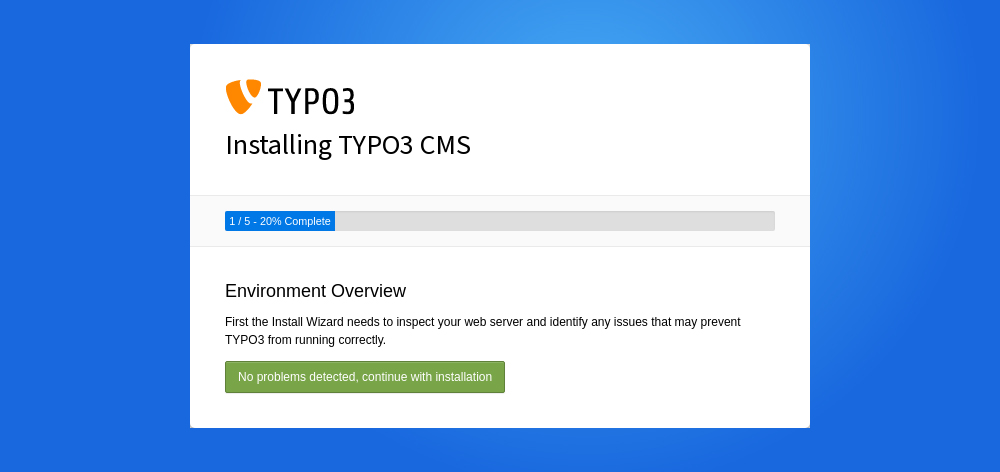
Once all server configurations are complete, it’s time to finish the setup through the TYPO3 Installation Wizard. This user-friendly, step-by-step wizard helps you finalize the installation process directly in your browser.
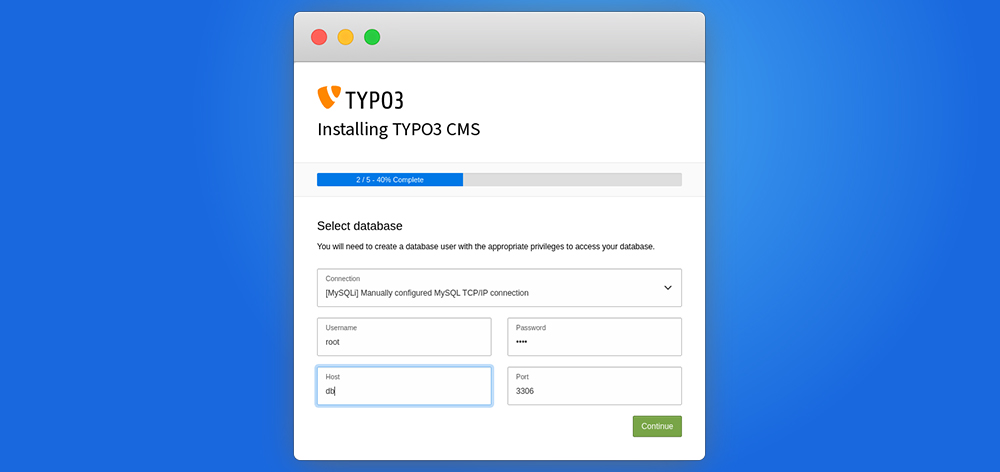
Step 1. Check the System Environment (detect if any issues)
Step 2. Setup Your Database Credentials
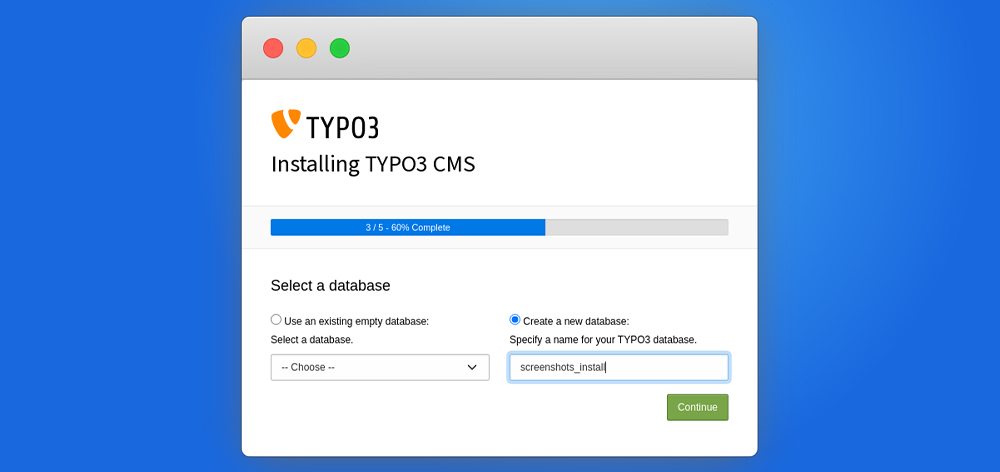
Step 3. Choose an Existing Database or Create a New
Step 4. Create backend user & Site
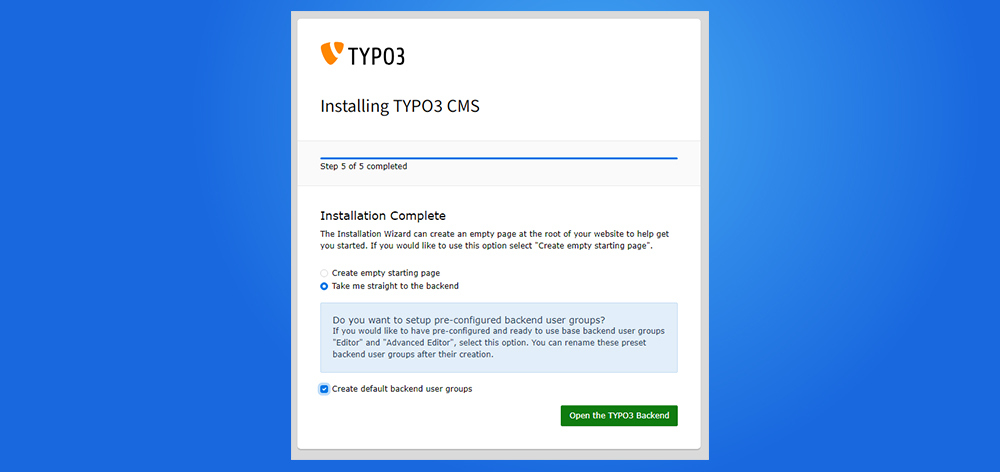
Step 5. Installation Process Start
Define your site name and initial setup options. You can also choose to load a distribution or start with a blank site.
You did it! Now you have a running TYPO3 website on AWS.
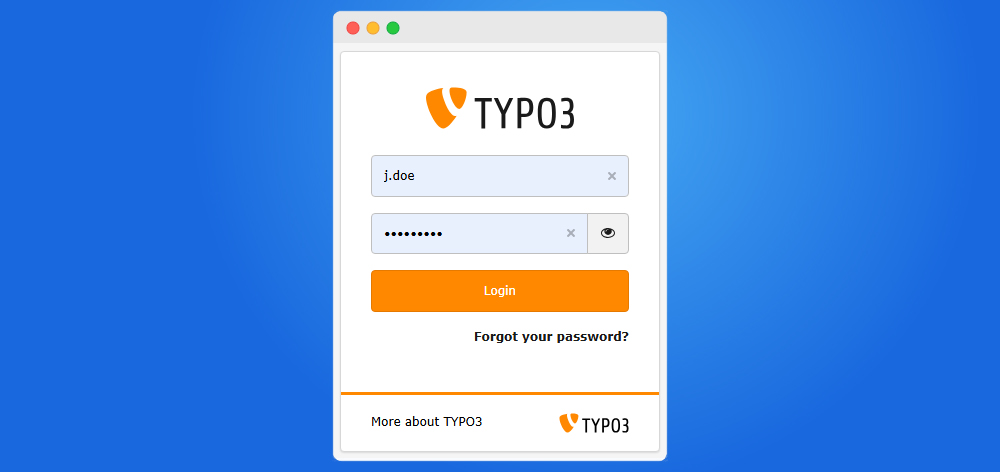
Step 6. Get Start with Backend Login
TYPO3 Docker vs Other Platforms
Choosing the right environment for your TYPO3 project depends on your technical needs, budget, and scalability plans. Here’s a quick comparison to help you decide:
| Platform | Best For | Key Benefits | Things to Consider |
| Docker / Docker Compose | Local dev, testing, or microservices setups | Lightweight, fast to deploy, reproducible environments | Needs Docker expertise, not ideal for large production without orchestration |
| Ubuntu (Self-Managed) | Developers and teams wanting full control and customization | Free, open-source, highly flexible, large community support, easy optimization for TYPO3 | Requires server management skills (updates, security, performance tuning) |
| Google Cloud Platform | Teams already using Google ecosystem | Easy G Suite integration, powerful analytics tools, scalable infrastructure | Slightly higher learning curve for beginners |
| AWS (Amazon Web Services) | Scalable production environments | High availability, global reach, flexible resources, strong security | Slightly higher learning curve for beginners |
| Microsoft Azure | Enterprises using Microsoft technologies | Seamless integration with Windows, Office, Active Directory, hybrid cloud | Licensing and costs may be higher |
| Platform.sh | Developers focused on CI/CD & automation | Git-based workflows, automatic scaling, zero-downtime deployments | Less control over underlying infrastructure, premium pricing |
TYPO3 Docker Tips & Best Practices
- Use .env files for sensitive data and reuse across projects.
- Set TYPO3_CONTEXT to differentiate dev/staging/prod:
environment:
- TYPO3_CONTEXT=Development- Enable Xdebug with DDEV for debugging: ddev xdebug on
- TYPO3 relies a lot on OPcache to run fast, so make sure it’s properly set up in your php.ini file.
- Also, when using Composer, always lock the TYPO3 version (like ^13.1) instead of using dev-master to avoid unexpected updates.
Troubleshooting Common TYPO3 Docker Issues
- White screen after install
This usually happens because of incorrect file or folder permissions. Useddev sshor access the container to check and fix the permissions. - "No database connection" error
Make sure your database container is running. Also double-check the database name, username, and password in TYPO3 — they must match the values in your Docker or DDEV setup. - TYPO3 site not opening in the browser
Check the port settings in yourdocker-compose.ymlfile. For example, it should say80:80for the site to be available athttp:// localhost. If you’re using DDEV, confirm that the DDEV router is running properly. - Image processing issues in TYPO3
TYPO3 needs PHP extensions likegdorimagickto process images. Make sure these extensions are installed and enabled in your PHP Docker container.
Conclusion
Containerizing your TYPO3 application with Docker and Docker Compose provides a modern, reproducible environment. By separating your services (web, PHP-FPM, database) into distinct containers, you gain better modularity, easier scaling, and improved reliability.
Whether you're just starting out or fine-tuning your environment, Docker makes working with TYPO3 easier, faster, and more flexible. From the first TYPO3 login screen to full-scale deployment, Docker gives you the tools to build, scale, and manage your TYPO3 projects with confidence.
Happy TYPO3ing with Docker!
FAQ for TYPO3 Docker
Yes, but it's recommended only if you're experienced with Docker. For production, ensure you're using optimized images, secure configurations, and proper volume/data handling. Tools like Kubernetes or Docker Swarm are often used for scalable deployments.
It’s recommended for a cleaner microservices approach, but you can also use a single php:apache container to simplify.
Just switch the image to mysql:8.0 (or another version) in the docker-compose.yml and update environment variables accordingly.
Either use a Dockerfile that installs Composer or run a separate Composer container. Some prefer building a custom image with Composer baked in.
No. While DDEV is the easiest and most beginner-friendly method, you can also use custom Docker Compose setups or WebDevOps TYPO3 images for more control and flexibility.
Mount volumes for public/fileadmin or other relevant directories. This ensures data persists even if containers are destroyed.
It’s typically used for development. For production, you might use Docker Swarm, Kubernetes, or another orchestrator. However, small-scale deployments can run Docker Compose in production if carefully managed.
You can add an SSL certificate in your Nginx config and expose port 443, or place a reverse proxy (like Traefik or Nginx Proxy Manager) in front of your containers.
If using Composer, update your composer.json version, run composer update, and restart containers. For the classic .zip approach, replace files in public/ accordingly.
Docker Compose isn’t strictly required, but it simplifies multi-container setups. You can absolutely do everything in one container, though it’s less modular.
For the DB, either run a mysqldump command in the database container or schedule it externally. For uploads, back up your volume (folder) to a safe location.



Wolfgang Weber
Brand & Communication LeadWolfgang Weber shapes TYPO3 with passion and expertise. As TYPO3 enthusiast, he has contributed to TYPO3 projects that make websites faster and more secure. Outside of TYPO3, you'll probably find him exploring local cafés and…
More From Author