Welcome to our step-by-step guide on how to install TYPO3 with DDEV! DDEV has truly revolutionized local TYPO3 development. Its combination of Docker-based consistency, easy configuration, and specialized knowledge of TYPO3’s structure makes local dev a delight. By following these steps—configuring your .ddev folder, installing TYPO3 via Composer, and leveraging best practices like snapshots and override configs—you’ll have a robust, quick, and reproducible environment.
In this guide, you'll learn how to install TYPO3 with DDEV using Composer. Whether you're doing a fresh TYPO3 DDEV download, or working on an existing TYPO3 site, DDEV makes local development smooth and error-free.
Wait! Before we move forward, if you want to learn how to install TYPO3 on other platforms, check out the article below—it’s made just for you.
Let’s dive into the step-by-step TYPO3 DDEV setup and get your site running in no time!
What Is TYPO3?
TYPO3 is a free, open-source Content Management System (CMS) built to help businesses and organizations create, manage, and grow their websites. It was founded in 1997 by Kasper Skårhøj and has since become one of the most popular CMS platforms—especially across Europe.
TYPO3 is written in PHP and uses TypoScript, a powerful configuration language that allows for advanced customization and flexibility. You don’t need any special software—TYPO3 runs in your browser and outputs content using standard HTML and JavaScript.
Whether you’re running a small business site, a university portal, or a large enterprise website, TYPO3 can scale to fit your needs.
Imagine an enterprise CMS that evolves as your project grows—without piling on complexity. That’s TYPO3 for you! It’s an open-source powerhouse that excels at:
here are the key reasons that TYPO3 Developers, marketers, and agencies trust TYPO3 for its:
- Modularity: Make your website do exactly what you need. No more, no less.
- Security & Stability: Regular LTS (Long-Term Support) releases help you stay secure for years.
- Scalability: From a tiny local site to a massive global platform, TYPO3 can handle it.
- Community-Driven Development: Enjoy a lively global community that refines and evolves TYPO3 continuously.
Did You Know? TYPO3 powers over 500,000+ active websites around the world!
Read more TYPO3 Facts.
Why use TYPO3?
TYPO3 offers advanced features like granular user roles, multisite management, and a strong ecosystem of extensions. It’s perfect for businesses and agencies that need scalability and long-term support.
What do you need to run TYPO3 DDEV smoothly?
Before you start the TYPO3 DDEV install, make sure your system is ready. Running TYPO3 locally with DDEV requires a few essential tools and the right environment. Below are the key things you'll need for a successful DDEV TYPO3 setup:
1. Docker
Docker is the foundation of the TYPO3 Docker setup. It creates a containerized environment that runs TYPO3 separately from your local system. This helps avoid version conflicts and ensures consistency across different machines.
2. DDEV
DDEV makes it easy to manage local development setups. With a few simple commands, you can spin up a full TYPO3 environment. It streamlines the TYPO3 DDEV install process and handles all the technical details behind the scenes.
3. Operating System
You can run DDEV TYPO3 setup on Windows, macOS, or Linux. Just make sure Docker is supported and installed on your platform.
4. PHP Compatibility
The TYPO3 version you choose determines which PHP version you’ll need. DDEV allows you to set your PHP version in the config file, making it easy to match TYPO3 requirements.
5. Database (MySQL/MariaDB)
Every TYPO3 project needs a database to store content and configuration. DDEV automatically sets up MariaDB (a MySQL-compatible database) for you, so there’s no need for manual installation.
6. SSH Access
An SSH client helps you interact with the Docker containers. You’ll use commands like ddev ssh to access the TYPO3 file system and run Composer inside your web container.
7. Composer & Git
To install TYPO3 with DDEV, you’ll need Composer to manage TYPO3 packages and dependencies. A Git client is also useful for version control if you're collaborating with a team or maintaining a project repository.
How to TYPO3 DDEV Install?
You can setup TYPO3 DDEV using this step by step guide.
Why run DDEV on TYPO3?
But before we understand why we should run TYPO3, let's first understand what TYPO3 DDEV is.
What is TYPO3 DDEV?
TYPO3 DDEV is a combination of the TYPO3 CMS and the DDEV development tool, used together to create a fast, consistent, and easy-to-manage local development environment.
DDEV is a container-based local development environment (built on Docker) that streamlines your workflow, letting you spin up reproducible, platform-agnostic dev setups in minutes. No more messy manual configs for Apache/Nginx, PHP versions, or MySQL. DDEV’s out-of-the-box support for TYPO3 makes it a no-brainer.
Key Benefits of Installing TYPO3 with DDEV
Choosing to install TYPO3 with DDEV offers many advantages for developers, teams, and agencies working on TYPO3 projects. It’s not just about saving time—it’s about creating a fast, clean, and consistent local development setup.
- Consistency: Everyone on your team runs the same environment.
- Automation: Shell commands, composer usage, database interactions – all integrated.
- Flexibility: Easy to add services (Redis, Solr, etc.).
- Community: DDEV is well-maintained and popular, especially among TYPO3 devs.
Read More about learn to launch TYPO3 DDEV in minutes!
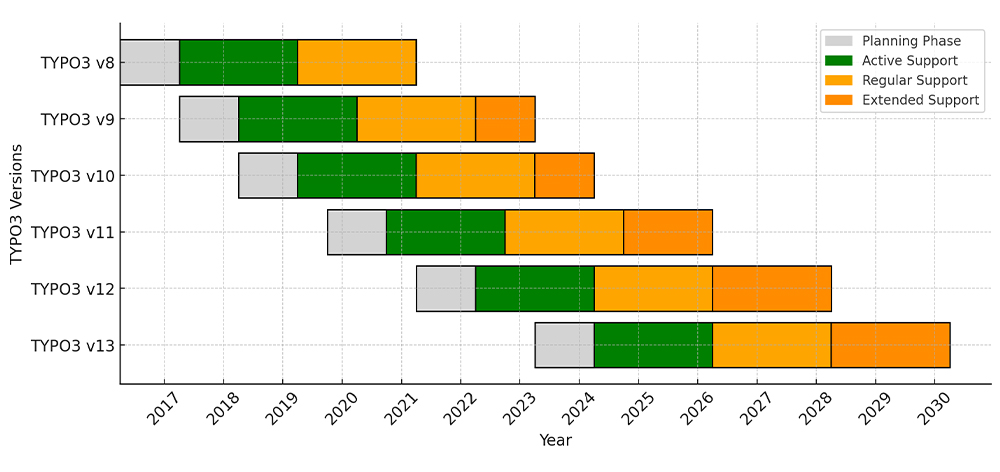
TYPO3 Versions & Support Roadmap
Before diving in, note TYPO3’s release cycles:
- LTS (Long-Term Support): Typically three years of updates per major release.
- ELTS (Extended LTS): Paid option if you need extra time beyond standard LTS.
Staying on a currently supported LTS means you’ll get important security patches and feature improvements.
TYPO3 Version & PHP Compatibility
When setting up your TYPO3 site using DDEV, it’s important to choose the correct PHP version based on the TYPO3 version you plan to use
1. PHP & TYPO3 Compatibility
| TYPO3 Version | PHP Versions | Status |
| 9 ELTS | 7.2–7.4 | Active ELTS |
| 10 ELTS | 7.2–7.4 | Active ELTS |
| 11 ELTS | 7.4, 8.0 | Active ELTS |
| 12 LTS | 8.1–8.4 | Active ELTS |
| 13 LTS | 8.2–8.4 | Active ELTS |
Getting Started with setup TYPO3 DDEV tutorial
To follow along, you’ll need:
- Docker installed and running on your machine (Docker Desktop for Windows/Mac, or Docker Engine on Linux).
- DDEV CLI installed.
# Download and run the install script
curl -fsSL https://ddev.com/install.sh | bashInstall the best suitable for your platform from the official DDEV installation guide.
Once installed, check versions:
- docker --version
- ddev --version
You should see Docker and DDEV version info. If everything’s set, you’re ready to roll.
Creating the Installation Directory
Let’s assume you’re creating a fresh TYPO3 project. Create a folder, e.g., my-typo3-project, and navigate into it:
mkdir my-typo3-project
cd my-typo3-projectInside, we’ll let DDEV do its magic.
1 The “ddev config” Command
ddev configDDEV will prompt for a few details:
- Project Name: my-typo3-project (or anything you like).
- Docroot Location: Typically public or your desired web root.
- Project Type: Choose typo3 from the list.+
This command creates a hidden folder, .ddev/, containing essential config files:
- config.yaml
- docker-compose.*.yaml (optional overrides)
Pro Tip: If you have an existing TYPO3 codebase, ensure your public/ folder or equivalent is set as docroot in ddev config.
Installing TYPO3 via Composer
Now that DDEV knows this is a TYPO3 project, let’s pull down the TYPO3 code. We’ll do this inside the container, so we get the correct PHP version and dependencies.
Start the environment:
- ddev start
DDEV spawns Docker containers for web (Apache/Nginx + PHP), database, etc
Enter the web container:
- ddev ssh
This drops you into a shell in the container at /var/www/html.
Composer Create-Project:
composer create-project typo3/cms-base-distribution mysiteThis will create a mysite folder containing the TYPO3 core files. If your docroot is public, you can run:
composer create-project typo3/cms-base-distribution public- so that the final docroot is public.
File Ownership: DDEV typically handles permissions automatically, but confirm that new files in public/ are all accessible. If you see any oddities, you can run:
 exit    # to leave the container
ddev exec chown -R www-data:www-data /var/www/html/publicddev launchThis opens https: //my-typo3-project .ddev.site by default.
- You’ll see the TYPO3 Install Tool if everything is correct.
- Provide database details. DDEV sets environment variables automatically, so the default host is typically db, the DB name is db, user is db, password is db, etc. If the wizard prompts, use those credentials.
- Create your admin user, finalize setup, and enjoy your local TYPO3 instance.
Note: If you get a 404 or no such directory, ensure your docroot is correct in .ddev/config.yaml.
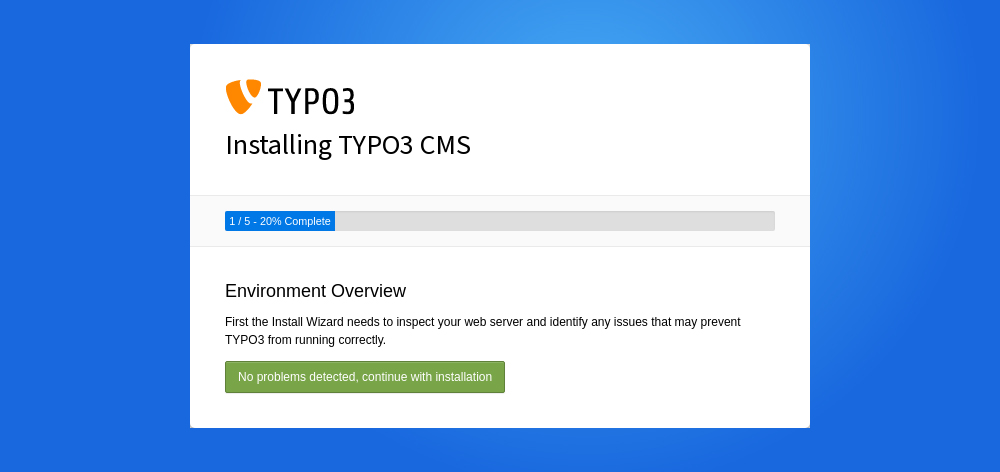
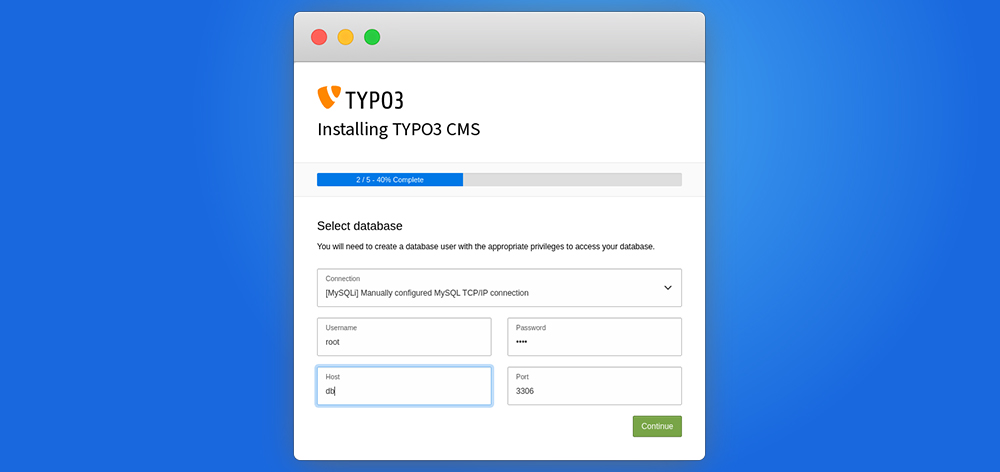
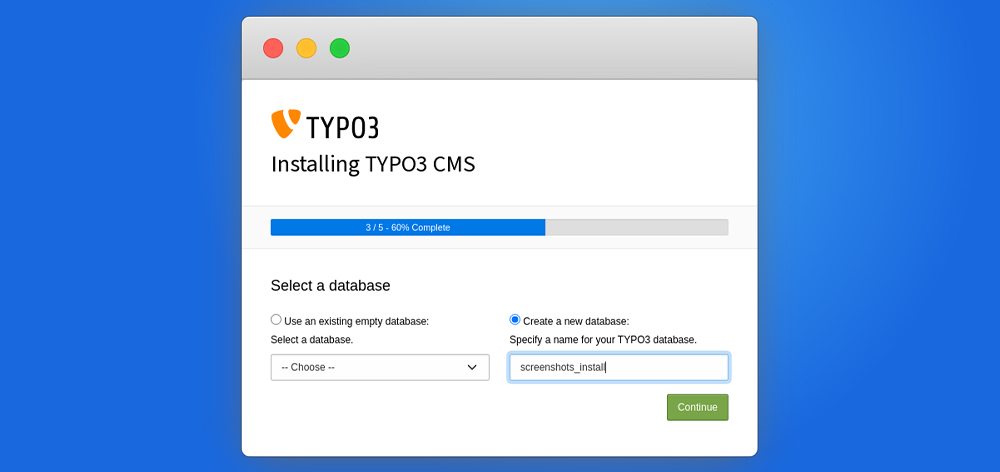
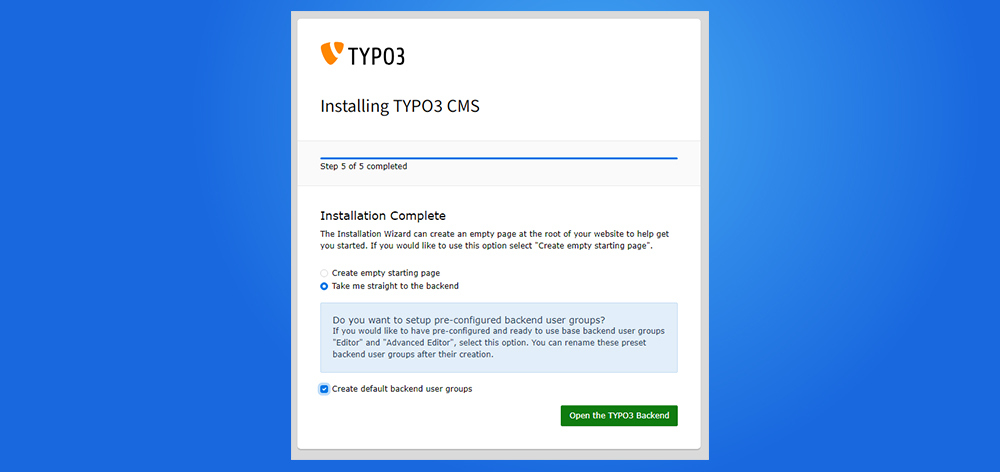
How to Start TYPO3 Installation Wizard
Once all server configurations are complete, it’s time to finish the setup through the TYPO3 Installation Wizard. This user-friendly, step-by-step wizard helps you finalize the installation process directly in your browser.
Step 1. Check the System Environment (detect if any issues)
Step 2. Setup Your Database Credentials
Step 3. Choose an Existing Database or Create a New
Step 4. Create backend user & Site
Step 5. Installation Process Start
Step 6. Get Start with Backend Login
Easy way to set up TYPO3 DDEV Workflow
1. The .ddev Folder
Inside .ddev, you’ll find:
- config.yaml: Main config – PHP version, docroot, project name, etc.
- docker-compose.*.yaml: Additional services or overrides (e.g., for Redis, Solr).
- db_snapshots/: (Optional) Stored DB backups.
A typical config.yaml for TYPO3 might look like:
name: my-typo3-project
type: typo3
docroot: public
php_version: "8.1"
router_http_port: "80"
router_https_port: "443"
webserver_type: apache-fpm
xdebug_enabled: false2. Common Commands
- ddev start – Spin up containers.
- ddev stop – Stop them.
- ddev poweroff – Stop all DDEV projects on your machine.
- ddev ssh – Jump into the web container.
- ddev composer [args] – Shortcut to run composer in the container.
- ddev exec [command] – Execute any shell command in the web container.
- ddev logs – View container logs.
- ddev describe – Overview of your project’s container URLs and info.
Adding Extra Services & Extensions
Want to spice up your TYPO3 environment? DDEV supports additional services like Redis or Solr with minimal fuss.
1 Example: Redis
Create a file .ddev/docker-compose.redis.yaml:
version: '3.6'
services:
  redis:
    image: redis:6
    container_name: ddev-${DDEV_SITENAME}-redis
    ports:
      - 6379
    labels:
com.ddev.site-name: ${DDEV_SITENAME}- In .ddev/config.yaml, you can set environment variables or override php.ini to install the php-redis extension if needed. Then:
ddev restart3
- Now Redis is available at hostname redis on port 6379 inside your container.
2. Installing TYPO3 Extensions
Inside ddev ssh:
composer require georgringer/newsOr if you’re using the Classic approach, just place extension files in public/typo3conf/ext/. DDEV doesn’t mind either method – it’s the same environment.
Best Practices & Tips for TYPO3 DDEV Install
8.1 Manage Your Environment in Git
- Commit your .ddev/ folder (except config overrides with sensitive credentials if any).
- Everyone on the team clones the repo, runs ddev start, and voila—identical dev setups.
8.2 Using Xdebug
To debug code, enable Xdebug in .ddev/config.yaml:
- xdebug_enabled: true
Then ddev restart.
Set your IDE (e.g., PHPStorm or VSCode) to listen on port 9003 (or whichever Xdebug version). Insert breakpoints, watch variables, and debug away.
8.3 Database Snapshots
Use DDEV’s snapshot commands to back up your local DB:
- ddev snapshot
This creates a .tar.gz in .ddev/db_snapshots. Restore with:
- ddev snapshot restore [snapshotname]
8.4 Overriding PHP Config
Need a custom php.ini setting? Create .ddev/php/ini-overrides.ini with:
- memory_limit = 512M
- max_execution_time = 240
Then ddev restart.
TYPO3 DDEV Remote Hosting
DDEV excels locally, but you can also integrate with remote hosting or CI/CD:
- ddev pull from a remote environment (like a staging server).
- ddev push to push DB or files to a remote environment (with some providers).
- Automated pipelines can run DDEV-based steps in ephemeral Docker runners, ensuring consistent builds.
Conclusion
If you’re ready to say goodbye to the days of manually fiddling with PHP or MySQL versions, DDEV is your one-stop solution. Spin up a new TYPO3 site in minutes, share your config with teammates, debug with ease, and ship your best work faster. Installing DDEV is quick and straightforward, making it the perfect tool for TYPO3 development.
Happy TYPO3ing with DDEV!
FAQs For TYPO3 DDEV
No. Docker plus DDEV handles it all. Your host machine just needs Docker and the DDEV CLI.
DDEV is a layer atop Docker/Docker Compose that simplifies repeated tasks for dev environments. It includes automatic DNS resolution, project naming, command shortcuts, etc.
Absolutely. For each project’s .ddev/config.yaml, set php_version: "8.1", php_version: "8.2", etc. Then ddev restart.
Nope! DDEV supports Drupal, WordPress, Laravel, and more. But it has specialized config for TYPO3 that’s super convenient.
Typically, DDEV syncs file ownership. If not, run ddev exec chown -R www-data:www-data /var/www/html/public/fileadmin.
ddev logs shows logs from the container. For more detailed logs, ddev ssh and look in /var/log/apache2/ or ~/.ddev/ for some internal logs.
On Linux, ensure your user is in the “docker” group. On Windows/Mac, verify Docker Desktop is installed and running.
You can still use DDEV if Docker is available. Just ensure your old web servers (Apache, MySQL) are not blocking the same ports (80/443).
Yes. Each project has its own myproject.ddev.site domain. DDEV orchestrates separate containers per project.
Use mutagen or DDEV’s built-in volume mounting strategies. Docker file-sharing can be slow on certain OSs. Also, allocate enough memory/CPU to Docker Desktop.
DDEV is primarily for development. For production, you typically build your own Docker images or use a dedicated server environment. DDEV is not meant to be your final hosting solution.
You can’t mix them in the same container simultaneously. Switch your version in config.yaml and do ddev restart to use another version.



Wolfgang Weber
Brand & Communication LeadWolfgang Weber shapes TYPO3 with passion and expertise. As TYPO3 enthusiast, he has contributed to TYPO3 projects that make websites faster and more secure. Outside of TYPO3, you'll probably find him exploring local cafés and…
More From Author